标签:return RequestMapping SpringMVC 视图 Controller public String
1、概述
Spring MVC是Spring Framework的一部分,是基于Java实现MVC的轻量级Web框架。
Spring MVC的特点:
- 轻量级,简单易学
- 高效 , 基于请求响应的MVC框架
- 与Spring兼容性好,无缝结合
- 约定优于配置
- 功能强大:RESTful、数据验证、格式化、本地化、主题等
- 简洁灵活
Spring的web框架围绕DispatcherServlet [ 调度Servlet ] 设计。
DispatcherServlet的作用是将请求分发到不同的处理器。从Spring 2.5开始,使用Java 5或者以上版本的用户可以采用基于注解形式进行开发,十分简洁;
Spring MVC框架像许多其他MVC框架一样, 以请求为驱动 , 围绕一个中心Servlet分派请求及提供其他功能,DispatcherServlet是一个实际的Servlet (它继承自HttpServlet 基类)。
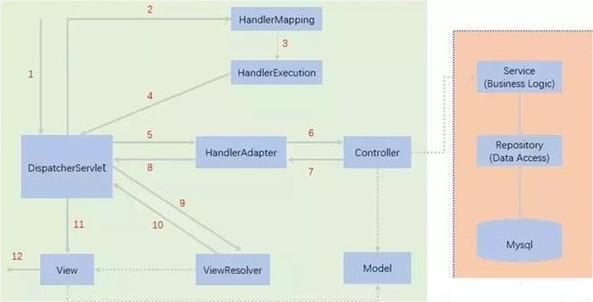
图为SpringMVC的一个较完整的流程图,实线表示SpringMVC框架提供的技术,不需要开发者实现,虚线表示需要开发者实现。
执行流程
-
DispatcherServlet表示前置控制器,是整个SpringMVC的控制中心。用户发出请求,DispatcherServlet接收请求并拦截请求。
-
HandlerMapping为处理器映射。DispatcherServlet调用。HandlerMapping,HandlerMapping根据请求url查找Handler。
-
HandlerExecution表示具体的Handler,其主要作用是根据url查找控制器。
-
HandlerExecution将解析后的信息传递给DispatcherServlet,如解析控制器映射等。
-
HandlerAdapter表示处理器适配器,其按照特定的规则去执行Handler。
-
Handler让具体的Controller执行。
-
Controller将具体的执行信息返回给HandlerAdapter,如ModelAndView。
-
HandlerAdapter将视图逻辑名或模型传递给DispatcherServlet。
-
DispatcherServlet调用视图解析器(ViewResolver)来解析HandlerAdapter传递的逻辑视图名。
-
视图解析器将解析的逻辑视图名传给DispatcherServlet。
-
DispatcherServlet根据视图解析器解析的视图结果,调用具体的视图。
-
最终视图呈现给用户
2、HelloSpringMVC
2.1、配置形式
-
导入依赖
-
配置web.xml , 注册DispatcherServlet
<?xml version="1.0" encoding="UTF-8"?> <web-app xmlns="http://xmlns.jcp.org/xml/ns/javaee" xmlns:xsi="http://www.w3.org/2001/XMLSchema-instance" xsi:schemaLocation="http://xmlns.jcp.org/xml/ns/javaee http://xmlns.jcp.org/xml/ns/javaee/web-app_4_0.xsd" version="4.0"> <!--1.注册DispatcherServlet--> <servlet> <servlet-name>springmvc</servlet-name> <servlet- class>org.springframework.web.servlet.DispatcherServlet </servlet-class> <!--关联一个springmvc的配置文件:【servlet-name】-servlet.xml--> <init-param> <param-name>contextConfigLocation</param-name> <param-value>classpath:springmvc-servlet.xml</param-value> </init-param> <!--启动级别-1--> <load-on-startup>1</load-on-startup> </servlet> <!--/ 匹配所有的请求;(不包括.jsp)--> <!--/* 匹配所有的请求;(包括.jsp)--> <servlet-mapping> <servlet-name>springmvc</servlet-name> <url-pattern>/</url-pattern> </servlet-mapping> </web-app> -
编写SpringMVC的配置文件
<?xml version="1.0" encoding="UTF-8"?> <beans xmlns="http://www.springframework.org/schema/beans" xmlns:xsi="http://www.w3.org/2001/XMLSchema-instance" xsi:schemaLocation="http://www.springframework.org/schema/beans http://www.springframework.org/schema/beans/spring-beans.xsd"> </beans> -
添加处理映射器、处理适配器、视图解析器
<bean class="org.springframework.web.servlet.handler.BeanNameUrlHandlerMapping" /> <bean class="org.springframework.web.servlet.mvc.SimpleControllerHandlerAdapter "/> <!--视图解析器:DispatcherServlet给他的ModelAndView--> <bean class="org.springframework.web.servlet.view.InternalResourceViewResolver" id="InternalResourceViewResolver"> <!--前缀--> <property name="prefix" value="/WEB-INF/jsp/"/> <!--后缀--> <property name="suffix" value=".jsp"/> </bean> -
编写业务操作 ,实现Controller接口,返回一个ModelAndView
//注意:这里我们先导入Controller接口 public class HelloController implements Controller { public ModelAndView handleRequest(HttpServletRequest request, HttpServletResponse response) throws Exception { //ModelAndView 模型和视图 ModelAndView mv = new ModelAndView(); //封装对象,放在ModelAndView中。Model mv.addObject("msg","HelloSpringMVC!"); //封装要跳转的视图,放在ModelAndView中 mv.setViewName("hello"); //: /WEB-INF/jsp/hello.jsp return mv; } } -
注册bean
<!--Handler--> <bean id="/hello" class="com.mixian.controller.HelloController"/> -
要是跳转的jsp页面
<%@ page contentType="text/html;charset=UTF-8" language="java" %>
<html>
    <head>
        <title>mixianshen</title>
    </head>
    <body>
        ${msg}
    </body>
</html>
2.2、注解形式
-
导入依赖
-
处理资源过滤问题
<build> <resources> <resource> <directory>src/main/java</directory> <includes> <include>**/*.properties</include> <include>**/*.xml</include> </includes> <filtering>false</filtering> </resource> <resource> <directory>src/main/resources</directory> <includes> <include>**/*.properties</include> <include>**/*.xml</include> </includes> <filtering>false</filtering> </resource> </resources> </build> -
配置web.xml
<?xml version="1.0" encoding="UTF-8"?>
<web-app xmlns="http://xmlns.jcp.org/xml/ns/javaee"
         xmlns:xsi="http://www.w3.org/2001/XMLSchema-instance"
         xsi:schemaLocation="http://xmlns.jcp.org/xml/ns/javaee
                             http://xmlns.jcp.org/xml/ns/javaee/web-app_4_0.xsd" version="4.0">
    <!--1.注册servlet-->
    <servlet>
        <servlet-name>springmvc</servlet-name>
        <servlet- class>org.springframework.web.servlet.DispatcherServlet</servlet-class>
        <!--通过初始化参数指定springmvc配置文件的位置,进行关联-->
        <init-param>
            <param-name>contextConfigLocation</param-name>
            <param-value>classpath:springmvc-servlet.xml</param-value>
        </init-param>
        <!-- 启动顺序,数字越小,启动越早 -->
        <load-on-startup>1</load-on-startup>
    </servlet>

    <!--所有请求都会被springmvc拦截 -->
    <servlet-mapping>
        <servlet-name>springmvc</servlet-name>
        <url-pattern>/</url-pattern>
    </servlet-mapping>
</web-app>
/ 和 /* 的区别:
< url-pattern > / </ url-pattern >不会匹配到.jsp, 只针对我们编写的请求;即:.jsp 不会进入spring的 DispatcherServlet类 。< url-pattern > /* </ url-pattern >会匹配 *.jsp,会出现返回jsp视图时再次进入spring的DispatcherServlet 类,导致找不到对应的controller所以报404错误
-
添加SpringMVC的配置文件
<?xml version="1.0" encoding="UTF-8"?> <beans xmlns="http://www.springframework.org/schema/beans" xmlns:xsi="http://www.w3.org/2001/XMLSchema-instance" xmlns:context="http://www.springframework.org/schema/context" xmlns:mvc="http://www.springframework.org/schema/mvc" xsi:schemaLocation="http://www.springframework.org/schema/beans http://www.springframework.org/schema/beans/spring-beans.xsd http://www.springframework.org/schema/context https://www.springframework.org/schema/context/spring- context.xsd http://www.springframework.org/schema/mvc https://www.springframework.org/schema/mvc/spring-mvc.xsd"> <!-- 自动扫描包,让指定包下的注解生效,由IOC容器统一管理 --> <context:component-scan base-package="com.mixian.controller"/> <!-- 让Spring MVC不处理静态资源 --> <mvc:default-servlet-handler /> <!-- 支持mvc注解驱动 在spring中一般采用@RequestMapping注解来完成映射关系 要想使@RequestMapping注解生效 必须向上下文中注册DefaultAnnotationHandlerMapping 和一个AnnotationMethodHandlerAdapter实例 这两个实例分别在类级别和方法级别处理。 而annotation-driven配置帮助我们自动完成上述两个实例的注入。 --> <mvc:annotation-driven /> <!-- 视图解析器 --> <bean class="org.springframework.web.servlet.view.InternalResourceViewResolver " id="internalResourceViewResolver"> <!-- 前缀 --> <property name="prefix" value="/WEB-INF/jsp/" /> <!-- 后缀 --> <property name="suffix" value=".jsp" /> </bean> </beans> -
创建controller
@Controller @RequestMapping("/HelloController") public class HelloController { //真实访问地址 : 项目名/HelloController/hello @RequestMapping("/hello") public String sayHello(Model model){ //向模型中添加属性msg与值,可以在JSP页面中取出并渲染 model.addAttribute("msg","hello,SpringMVC"); //web-inf/jsp/hello.jsp return "hello"; } }-
@Controller是为了让Spring IOC容器初始化时自动扫描到;
-
@RequestMapping是为了映射请求路径,这里因为类与方法上都有映射所以访问时应该是/HelloController/hello;
-
方法中声明Model类型的参数是为了把Action中的数据带到视图中;
-
方法返回的结果是视图的名称hello,加上配置文件中的前后缀变成WEB-INF/jsp/hello.jsp
-
-
视图层
<%@ page contentType="text/html;charset=UTF-8" language="java" %>
<html>
    <head>
        <title>SpringMVC</title>
    </head>
    <body>${msg}
    </body>
</html>
4、Controller和RestFul
4.1、Controller
-
控制器负责提供访问应用程序的行为,通常通过接口定义或注解定义两种方法实现。
-
控制器负责解析用户的请求并将其转换为一个模型。
-
在Spring MVC中一个控制器类可以包含多个方法
-
在Spring MVC中,对于Controller的配置方式有很多种
1、实现Controller接口
//实现该接口的类获得控制器功能
public interface Controller {
    //处理请求且返回一个模型与视图对象
    ModelAndView handleRequest(HttpServletRequest var1, HttpServletResponse var2) throws Exception;
}
//定义控制器
public class ControllerTest1 implements Controller {
    public ModelAndView handleRequest(HttpServletRequest httpServletRequest, HttpServletResponse httpServletResponse) throws Exception {
        //返回一个模型视图对象
        ModelAndView mv = new ModelAndView();
        mv.addObject("msg","Test1Controller");
        mv.setViewName("test");
        return mv;
    }
}
实现接口Controller定义控制器是较老的办法
缺点:一个控制器中只有一个方法,如果要多个方法则需要定义多个Controller;定义的方式比较麻烦;
2、使用注解@Controller
-
@Controller注解类型用于声明Spring类的实例是一个控制器
-
Spring可以使用扫描机制来找到应用程序中所有基于注解的控制器类,为了保证Spring能找到你的控制器,需要在配置文件中声明组件扫描。
<!-- 自动扫描指定的包,下面所有注解类交给IOC容器管理 -->
<context:component-scan base-package="com.mixian.controller"/>
//@Controller注解的类会自动添加到Spring上下文中
@Controller
public class ControllerTest2{
    //映射访问路径
    @RequestMapping("/t2")
    public String index(Model model){
        //Spring MVC会自动实例化一个Model对象用于向视图中传值
        model.addAttribute("msg", "ControllerTest2");
        //返回视图位置
        return "test";
    }
}
@RequestMapping
@RequestMapping注解用于映射url到控制器类或一个特定的处理程序方法。可用于类或方法上。用于类上,表示类中的所有响应请求的方法都是以该地址作为父路径。
@Controller
public class TestController {
    @RequestMapping("/h1")
    public String test(){
        return "test";
    }
}
4.2、RestFul风格
Restful就是一个资源定位及资源操作的风格。不是标准也不是协议,只是一种风格。基于这个风格设计的软件可以更简洁,更有层次,更易于实现缓存等机制。
资源:
-
互联网所有的事物都可以被抽象为资源
-
资源操作:使用POST、DELETE、PUT、GET,使用不同方法对资源进行操作。
-
分别对应 添加、 删除、修改、查询
传统方式操作资源 :通过不同的参数来实现不同的效果!方法单一,post 和 get
http://127.0.0.1/item/queryItem.action?id=1 查询,GET
http://127.0.0.1/item/saveItem.action 新增,POST
http://127.0.0.1/item/updateItem.action 更新,POST
http://127.0.0.1/item/deleteItem.action?id=1 删除,GET或POST
使用RESTful操作资源 : 可以通过不同的请求方式来实现不同的效果!如下:请求地址一样,但是功能可以不同!
http://127.0.0.1/item/1 查询,GET
http://127.0.0.1/item 新增,POST
http://127.0.0.1/item 更新,PUT
http://127.0.0.1/item/1 删除,DELETE
使用method属性指定请求类型
用于约束请求的类型,可以收窄请求范围。指定请求谓词的类型如GET, POST, HEAD, OPTIONS, PUT, PATCH, DELETE, TRACE等
//映射访问路径,必须是POST请求
@RequestMapping(value = "/hello",method = {RequestMethod.POST})
public String index2(Model model){
    model.addAttribute("msg", "hello!");
    return "test";
}
所有的地址栏请求默认都会是 HTTP GET 类型的。
方法级别的注解变体有如下几个: 组合注解
@GetMapping
@PostMapping
@PutMapping
@DeleteMapping
@PatchMapping
5、结果跳转
5.1、ModelAndView
<!-- 视图解析器 -->
<bean class="org.springframework.web.servlet.view.InternalResourceViewResolver" id="internalResourceViewResolver">
    <!-- 前缀 -->
    <property name="prefix" value="/WEB-INF/jsp/" />
    <!-- 后缀 -->
    <property name="suffix" value=".jsp" />
</bean>
public class ControllerTest1 implements Controller {
    public ModelAndView handleRequest(HttpServletRequest httpServletRequest, HttpServletResponse httpServletResponse) throws Exception {
        //返回一个模型视图对象
        ModelAndView mv = new ModelAndView();
        mv.addObject("msg","ControllerTest1");
        mv.setViewName("test");
        return mv;
    }
}
5.2、ServletAPI
通过设置ServletAPI , 不需要视图解析器
-
通过HttpServletResponse进行输出
-
通过HttpServletResponse实现重定向
-
通过HttpServletResponse实现转发
@Controller
public class ResultGo {
    @RequestMapping("/result/t1")
    public void test1(HttpServletRequest req, HttpServletResponse rsp) throws IOException {
        rsp.getWriter().println("Hello,Spring BY servlet API");
    }
    @RequestMapping("/result/t2")
    public void test2(HttpServletRequest req, HttpServletResponse rsp) throws IOException {
        rsp.sendRedirect("/index.jsp");
    }
    @RequestMapping("/result/t3")
    public void test3(HttpServletRequest req, HttpServletResponse rsp) throws Exception {
        //转发
        req.setAttribute("msg","/result/t3");
        req.getRequestDispatcher("/WEB-INF/jsp/test.jsp").forward(req,rsp);
    }
}
5.3、SpringMVC
无需视图解析器
@Controller
public class ResultSpringMVC {
    @RequestMapping("/rsm/t1")
    public String test1(){
        //转发
        return "/index.jsp";
    }
    @RequestMapping("/rsm/t2")
    public String test2(){
        //转发二
        return "forward:/index.jsp";
    }
    @RequestMapping("/rsm/t3")
    public String test3(){
        //重定向
        return "redirect:/index.jsp";
    }
}
有视图解析器
@Controller
public class ResultSpringMVC2 {
    @RequestMapping("/rsm2/t1")
    public String test1(){
        //转发
        return "test";
    }
    @RequestMapping("/rsm2/t2")
    public String test2(){
        //重定向
        return "redirect:/index.jsp";
    }
}
6、数据处理
6.1、处理提交数据
提交的域名称和处理方法的参数名一致
http://localhost:8080/hello?name=mixian
@RequestMapping("/hello")
public String hello(String name){
    System.out.println(name);
    return "hello";
}
提交的域名称和处理方法的参数名不一致
http://localhost:8080/hello?username=mixian
@RequestMapping("/hello")
public String hello(@RequestParam("username") String name){
    System.out.println(name);
    return "hello";
}
提交的是一个对象
要求提交的表单域和对象的属性名一致 , 参数使用对象即可
public class User {
    private int id;
    private String name;
    private int age;
}
http://localhost:8080/mvc04/user?name=mixian&id=1&age=15
@RequestMapping("/user")
public String user(User user){
    System.out.println(user);
    return "hello";
}
如果使用对象的话,前端传递的参数名和对象名必须一致,否则就是null
6.2、数据显示到前端
1.通过ModelAndView
public class ControllerTest1 implements Controller {
    public ModelAndView handleRequest(HttpServletRequest httpServletRequest, HttpServletResponse httpServletResponse) throws Exception {
        //返回一个模型视图对象
        ModelAndView mv = new ModelAndView();
        mv.addObject("msg","ControllerTest1");
        mv.setViewName("test");
        return mv;
    }
}
2.通过ModelMap
@RequestMapping("/hello")
public String hello(@RequestParam("username") String name, ModelMap model){
    //封装要显示到视图中的数据
    //相当于req.setAttribute("name",name);
    model.addAttribute("name",name);
    System.out.println(name);
    return "hello";
}
3.通过Model
@RequestMapping("/ct2/hello")
public String hello(@RequestParam("username") String name, Model model){
    //封装要显示到视图中的数据
    //相当于req.setAttribute("name",name);
    model.addAttribute("msg",name);
    System.out.println(name);
    return "test";
}
对比
-
Model 只有寥寥几个方法只适合用于储存数据,简化了新手对于Model对象的操作和理解;
-
ModelMap 继承了 LinkedMap ,除了实现了自身的一些方法,同样的继承 LinkedMap 的方法和特 性;
-
ModelAndView 可以在储存数据的同时,可以进行设置返回的逻辑视图,进行控制展示层的跳转。
6.3、乱码问题
<form action="/e/t" method="post">
    <input type="text" name="name">
    <input type="submit">
</form>
@Controller
public class Encoding {
    @RequestMapping("/e/t") public String test(Model model,String name){
        model.addAttribute("msg",name); //获取表单提交的值
        return "test"; //跳转到test页面显示输入的值
    }
}
使用SpringMVC提供的过滤器,在web.xml中配置
<filter>
    <filter-name>encoding</filter-name>
    <filter- class>org.springframework.web.filter.CharacterEncodingFilter</filter-class>
    <init-param>
        <param-name>encoding</param-name>
        <param-value>utf-8</param-value>
    </init-param>
</filter>
<filter-mapping>
    <filter-name>encoding</filter-name>
    <url-pattern>/*</url-pattern>
</filter-mapping>
有些极端情况下.这个过滤器对get的支持不好
-
修改tomcat配置文件 : 设置编码!
<Connector URIEncoding="utf-8" port="8080" protocol="HTTP/1.1" connectionTimeout="20000" redirectPort="8443" /> -
自定义过滤器
/**
* 解决get和post请求 全部乱码的过滤器
*/
public class GenericEncodingFilter implements Filter {
    @Override
    public void destroy() {
    }

    @Override
    public void doFilter(ServletRequest request, ServletResponse response, FilterChain chain) throws IOException, ServletException {
        //处理response的字符编码
        HttpServletResponse myResponse=(HttpServletResponse) response;
        myResponse.setContentType("text/html;charset=UTF-8");

        // 转型为与协议相关对象
        HttpServletRequest httpServletRequest = (HttpServletRequest) request;

        // 对request包装增强
        HttpServletRequest myrequest = new MyRequest(httpServletRequest);
        chain.doFilter(myrequest, response);
    }

    @Override
    public void init(FilterConfig filterConfig) throws ServletException {
    }
}

//自定义request对象,HttpServletRequest的包装类
class MyRequest extends HttpServletRequestWrapper {
    private HttpServletRequest request;
    //是否编码的标记
    private boolean hasEncode;
    //定义一个可以传入HttpServletRequest对象的构造函数,以便对其进行装饰
    public MyRequest(HttpServletRequest request) {
        super(request);// super必须写
        this.request = request;
    }

    // 对需要增强方法进行覆盖
    @Override
    public Map getParameterMap() {
        // 先获得请求方式
        String method = request.getMethod();
        if (method.equalsIgnoreCase("post")) {
            // post请求
            try {
                // 处理post乱码
                request.setCharacterEncoding("utf-8");
                return request.getParameterMap();
            } catch (UnsupportedEncodingException e) {
                e.printStackTrace();
            }
        } else if (method.equalsIgnoreCase("get")) {
            // get请求
            Map<String, String[]> parameterMap = request.getParameterMap();
            if (!hasEncode) { // 确保get手动编码逻辑只运行一次
                for (String parameterName : parameterMap.keySet()) {
                    String[] values = parameterMap.get(parameterName);
                    if (values != null) {
                        for (int i = 0; i < values.length; i++) {
                            try {
                                // 处理get乱码
                                values[i] = new String(values[i] .getBytes("ISO-8859-1"), "utf- 8");
                            } catch (UnsupportedEncodingException e) {
                                e.printStackTrace();
                            }
                        }
                    }
                }hasEncode = true;
            }
            return parameterMap;
        }
        return super.getParameterMap();
    }

    //取一个值
    @Override
    public String getParameter(String name) {
        Map<String, String[]> parameterMap = getParameterMap();
        String[] values = parameterMap.get(name);
        if (values == null) {
            return null;
        }
        return values[0]; // 取回参数的第一个值
    }

    //取所有值
    @Override public String[] getParameterValues(String name) {
        Map<String, String[]> parameterMap = getParameterMap();
        String[] values = parameterMap.get(name);
        return values;
    }
}
6.4、JSON
- JSON 指的是 JavaScript 对象表示法(JavaScript Object Notation)
- JSON 是轻量级的文本数据交换格式
- JSON 独立于语言:JSON 使用 Javascript语法来描述数据对象,但是 JSON 仍然独立于语言和平台。JSON 解析器和 JSON 库支持许多不同的编程语言。 目前非常多的动态(PHP,JSP,.NET)编程语言都支持JSON。
- JSON 具有自我描述性,更易理解
前端
//将字符串转化为JSON
JSON.stringify();
//将JSON转换为对象
JSON.parse();
后端
1.使用Jackson
导入依赖
<!-- https://mvnrepository.com/artifact/com.fasterxml.jackson.core/jackson-databind -->
<dependency>
    <groupId>com.fasterxml.jackson.core</groupId>
    <artifactId>jackson-databind</artifactId>
    <version>2.13.3</version>
</dependency>
@Controller
//@RestController   不走视图解析器
public class UserController{
    @RequestMapping("/t1")
    @ResponseBody//不会走视图解析器,直接返回字符串
    public String json() trows JsonProcessingException{
        ObjectMapper mapper = new ObjectMapper();
        User user = new User("mixian",3,"男");
        return mapper.writerValueAsString(user);
    }
}
在springmvc.xml中,JSON乱码问题配置
<mvc:annotation-driven>
    <mvc:message-converters>
        <bean class="org.springframework.http.converter.StringHttpMessageConverter">
            <constructor-arg value="UTF-8"/>
        </bean>
        <bean class="org.springframework.http.converter.json.MappingJackson2HttpMessageConverter">
            <property name="objectMapper">
                <bean class="org.springframework.http.converter.json.Jackson2ObjectMapperFactoryBean">
                    <property name="failOnEmptyBeans" value="false"/>
                </bean>
            </property>
        </bean>
    </mvc:message-converters>
</mvc:annotation-driven>
2.FastJson
导入依赖
<!-- https://mvnrepository.com/artifact/com.alibaba/fastjson -->
<dependency>
    <groupId>com.alibaba</groupId>
    <artifactId>fastjson</artifactId>
    <version>2.0.12</version>
</dependency>
@Controller
public class UserController{
    @RequestMapping("/t2")
    public String json2() trows JsonProcessingException{
        List<User> userList = new List<User>();
        User user = new User("mixian",1,"男");
        User user2 = new User("mixian",2,"男");
        User user2 = new User("mixian",3,"男");
        userList.add(user);
        userList.add(user2);
        userList.add(user3);

        //java对象-->JSON字符串
        String str = JSON.toJSONString(userList);
        System.out.println(str);
        //JSON字符串-->java对象
        User str2 = JSON.parseObject(userList);
        System.out.println(str2);
        //java对象-->JSON对象
        JSONObject str3 = (JSONObject)JSON.toJSON(userList);
        System.out.println(str3);
        //JSON对象-->java对象
        User str4 = JSON.toJavaObject(userList);
        System.out.println(str4);

        return "hello";
    }
}
7、整合SSM
CREATE DATABASE `ssmbuild`;

USE `ssmbuild`;

DROP TABLE IF EXISTS `books`;

CREATE TABLE `books` (
    `bookID` INT(10) NOT NULL AUTO_INCREMENT COMMENT '书id',
    `bookName` VARCHAR(100) NOT NULL COMMENT '书名',
    `bookCounts` INT(11) NOT NULL COMMENT '数量',
    `detail` VARCHAR(200) NOT NULL COMMENT '描述', KEY
    `bookID` (`bookID`)
) ENGINE=INNODB DEFAULT CHARSET=utf8;

INSERT INTO `books`(`bookID`,`bookName`,`bookCounts`,`detail`)VALUES
(1,'Java',1,'从入门到放弃'),
(2,'MySQL',10,'从删库到跑路'),
(3,'Linux',5,'从进门到进牢');
导入依赖
<dependencies>
    <!--Junit-->
    <dependency>
        <groupId>junit</groupId>
        <artifactId>junit</artifactId>
        <version>4.12</version>
    </dependency>
    <!--数据库驱动-->
    <dependency>
        <groupId>mysql</groupId>
        <artifactId>mysql-connector-java</artifactId
            > <version>5.1.47</version>
    </dependency>
    <!-- 数据库连接池 -->
    <dependency>
        <groupId>com.mchange</groupId>
        <artifactId>c3p0</artifactId>
        <version>0.9.5.2</version>
    </dependency>
    <!--Servlet - JSP -->
    <dependency>
        <groupId>javax.servlet</groupId>
        <artifactId>servlet-api</artifactId>
        <version>2.5</version>
    </dependency>
    <dependency>
        <groupId>javax.servlet.jsp</groupId>
        <artifactId>jsp-api</artifactId>
        <version>2.2</version>
    </dependency>
    <dependency>
        <groupId>javax.servlet</groupId>
        <artifactId>jstl</artifactId>
        <version>1.2</version>
    </dependency>
    <!--Mybatis-->
    <dependency>
        <groupId>org.mybatis</groupId>
        <artifactId>mybatis</artifactId>
        <version>3.5.2</version>
    </dependency>
    <dependency>
        <groupId>org.mybatis</groupId>
        <artifactId>mybatis-spring</artifactId>
        <version>2.0.2</version>
    </dependency>
    <!--Spring-->
    <dependency>
        <groupId>org.springframework</groupId>
        <artifactId>spring-webmvc</artifactId>
        <version>5.1.9.RELEASE</version>
    </dependency> <dependency>
    <groupId>org.springframework</groupId>
    <artifactId>spring-jdbc</artifactId>
    <version>5.1.9.RELEASE</version>
    </dependency>
</dependencies>
资源过滤设置
<build>
    <resources>
        <resource>
            <directory>src/main/java</directory>
            <includes>
                <include>**/*.properties</include>
                <include>**/*.xml</include>
            </includes>
            <filtering>false</filtering>
        </resource>
        <resource>
            <directory>src/main/resources</directory>
            <includes>
                <include>**/*.properties</include>
                <include>**/*.xml</include>
            </includes>
            <filtering>false</filtering>
        </resource>
    </resources>
</build>
框架结构
com
- mixina
- pojo
- dao
- service
- controller
resources
-
applicationContext.xml
<?xml version="1.0" encoding="UTF-8"?> <beans xmlns="http://www.springframework.org/schema/beans" xmlns:xsi="http://www.w3.org/2001/XMLSchema-instance" xsi:schemaLocation="http://www.springframework.org/schema/beans http://www.springframework.org/schema/beans/spring- beans.xsd"> </beans> -
mybatis-config.xml
<?xml version="1.0" encoding="UTF-8" ?>
<!DOCTYPE configuration
 	PUBLIC "-//mybatis.org//DTD Config 3.0//EN"
	"http://mybatis.org/dtd/mybatis-3-config.dtd"> <configuration>

</configuration>
7.1、Mybatis层
-
数据库配置文件db.properties
jdbc.driver=com.mysql.jdbc.Driver jdbc.url=jdbc:mysql://localhost:3306/ssmbuild? useSSL=true&useUnicode=true&characterEncoding=utf8 jdbc.username=root jdbc.password=123456 -
mybatis核心配置文件
<?xml version="1.0" encoding="UTF-8" ?> <!DOCTYPE configuration PUBLIC "-//mybatis.org//DTD Config 3.0//EN" "http://mybatis.org/dtd/mybatis-3-config.dtd"> <configuration> <typeAliases> <package name="com.mixian.pojo"/> </typeAliases> <mappers> <mapper resource="com/mixian/dao/BookMapper.xml"/> </mappers> </configuration> -
编写实体类com.mixian.pojo.Books
@Data @AllArgsConstructor @NoArgsConstructor public class Books { private int bookID; private String bookName; private int bookCounts; private String detail; } -
编写dao层mapper实现接口
public interface BookMapper { //增加一个Book int addBook(Books book); //根据id删除一个Book int deleteBookById(int id); //更新Book int updateBook(Books books); //根据id查询,返回一个Book Books queryBookById(int id); //查询全部Book,返回list集合 List<Books> queryAllBook(); } -
编写接口对应的mapper.xml文件
<?xml version="1.0" encoding="UTF-8" ?> <!DOCTYPE mapper PUBLIC "-//mybatis.org//DTD Mapper 3.0//EN" "http://mybatis.org/dtd/mybatis-3-mapper.dtd"> <mapper namespace="com.mixian.dao.BookMapper"> <!--增加一个Book--> <insert id="addBook" parameterType="Books"> insert into ssmbuild.books(bookName,bookCounts,detail) values (#{bookName}, #{bookCounts}, #{detail}) </insert> <!--根据id删除一个Book--> <delete id="deleteBookById" parameterType="int"> delete from ssmbuild.books where bookID=#{bookID} </delete> <!--更新Book--> <update id="updateBook" parameterType="Books"> update ssmbuild.books set bookName = #{bookName},bookCounts = #{bookCounts},detail = # {detail}where bookID = #{bookID} </update> <!--根据id查询,返回一个Book--> <select id="queryBookById" resultType="Books"> select * from ssmbuild.books where bookID = #{bookID} </select> <!--查询全部Book--> <select id="queryAllBook" resultType="Books"> SELECT * from ssmbuild.books </select> </mapper> -
编写service层接口和实现类
public interface BookService {
    //增加一个Book
    int addBook(Books book);

    //根据id删除一个Book
    int deleteBookById(int id);

    //更新Book
    int updateBook(Books books);

    //根据id查询,返回一个Book
    Books queryBookById(int id);

    //查询全部Book,返回list集合
    List<Books> queryAllBook();
}
public class BookServiceImpl implements BookService { //调用dao层的操作,设置一个set接口,方便Spring管理 private BookMapper bookMapper; public void setBookMapper(BookMapper bookMapper) { this.bookMapper = bookMapper; } public int addBook(Books book) { return bookMapper.addBook(book); } public int deleteBookById(int id) { return bookMapper.deleteBookById(id); } public int updateBook(Books books) { return bookMapper.updateBook(books); } public Books queryBookById(int id) { return bookMapper.queryBookById(id); } public List<Books> queryAllBook() { return bookMapper.queryAllBook(); } }
7.2、Spring层
-
配置Spring整合Mybatis,spring-dao.xml
<?xml version="1.0" encoding="UTF-8"?> <beans xmlns="http://www.springframework.org/schema/beans" xmlns:xsi="http://www.w3.org/2001/XMLSchema-instance" xmlns:context="http://www.springframework.org/schema/context" xsi:schemaLocation="http://www.springframework.org/schema/beans http://www.springframework.org/schema/beans/spring-beans.xsd http://www.springframework.org/schema/context https://www.springframework.org/schema/context/spring- context.xsd"> <!-- 1.关联数据库文件 --> <context:property-placeholder location="classpath:db.properties"/> <!-- 2.数据库连接池 --> <!--数据库连接池 dbcp 半自动化操作 不能自动连接 c3p0 自动化操作(自动的加载配置文件 并且设置到对象里面) --> <bean id="dataSource" class="com.mchange.v2.c3p0.ComboPooledDataSource"> <!-- 配置连接池属性 --> <property name="driverClass" value="${jdbc.driver}"/> <property name="jdbcUrl" value="${jdbc.url}"/> <property name="user" value="${jdbc.username}"/> <property name="password" value="${jdbc.password}"/> <!-- c3p0连接池的私有属性 --> <property name="maxPoolSize" value="30"/> <property name="minPoolSize" value="10"/> <!-- 关闭连接后不自动commit --> <property name="autoCommitOnClose" value="false"/> <!-- 获取连接超时时间 --> <property name="checkoutTimeout" value="10000"/> <!-- 当获取连接失败重试次数 --> <property name="acquireRetryAttempts" value="2"/> </bean> <!-- 3.配置SqlSessionFactory对象 --> <bean id="sqlSessionFactory" class="org.mybatis.spring.SqlSessionFactoryBean"> <!-- 注入数据库连接池 --> <property name="dataSource" ref="dataSource"/> <!-- 配置MyBaties全局配置文件:mybatis-config.xml --> <property name="configLocation" value="classpath:mybatis- config.xml"/> </bean> <!-- 4.配置扫描Dao接口包,动态实现Dao接口注入到spring容器中 --> <bean class="org.mybatis.spring.mapper.MapperScannerConfigurer"> <!-- 注入sqlSessionFactory --> <property name="sqlSessionFactoryBeanName" value="sqlSessionFactory"/> <!-- 给出需要扫描Dao接口包 --> <property name="basePackage" value="com.mixian.dao"/> </bean> </beans> -
Spring整合service层
<?xml version="1.0" encoding="UTF-8"?> <beans xmlns="http://www.springframework.org/schema/beans"
                                              xmlns:xsi="http://www.w3.org/2001/XMLSchema-instance"
                                              xmlns:context="http://www.springframework.org/schema/context"
                                              xsi:schemaLocation="http://www.springframework.org/schema/beans
    http://www.springframework.org/schema/beans/spring-beans.xsd
    http://www.springframework.org/schema/context
    http://www.springframework.org/schema/context/spring-context.xsd">

    <!-- 扫描service相关的bean -->
    <context:component-scan base-package="com.mixian.service" />

    <!--BookServiceImpl注入到IOC容器中-->
    <bean id="BookServiceImpl" class="com.mixian.service.BookServiceImpl">
        <property name="bookMapper" ref="bookMapper"/>
    </bean>

    <!-- 配置事务管理器 -->
    <bean id="transactionManager" class="org.springframework.jdbc.datasource.DataSourceTransactionManager" >
        <!-- 注入数据库连接池 -->
        <property name="dataSource" ref="dataSource" />
    </bean>
</beans>
7.3、SpringMVC层
-
web.xml
<?xml version="1.0" encoding="UTF-8"?> <web-app xmlns="http://xmlns.jcp.org/xml/ns/javaee" xmlns:xsi="http://www.w3.org/2001/XMLSchema-instance" xsi:schemaLocation="http://xmlns.jcp.org/xml/ns/javaee http://xmlns.jcp.org/xml/ns/javaee/web-app_4_0.xsd" version="4.0"> <!--DispatcherServlet--> <servlet> <servlet-name>DispatcherServlet</servlet-name> <servlet- class>org.springframework.web.servlet.DispatcherServlet</servlet-class> <init-param> <param-name>contextConfigLocation</param-name> <!--一定要注意:我们这里加载的是总的配置文件--> <param-value>classpath:applicationContext.xml</param-value> </init-param> <load-on-startup>1</load-on-startup> </servlet> <servlet-mapping> <servlet-name>DispatcherServlet</servlet-name> <url-pattern>/</url-pattern> </servlet-mapping> <!--encodingFilter--> <filter> <filter-name>encodingFilter</filter-name> <filter-class> org.springframework.web.filter.CharacterEncodingFilter </filter-class> <init-param> <param-name>encoding</param-name> <param-value>utf-8</param-value> </init-param> </filter> <filter-mapping> <filter-name>encodingFilter</filter-name> <url-pattern>/*</url-pattern> </filter-mapping> <!--Session过期时间--> <session-config> <session-timeout>15</session-timeout> </session-config> </web-app> -
配置spring-mvc.xml
<?xml version="1.0" encoding="UTF-8"?> <beans xmlns="http://www.springframework.org/schema/beans" xmlns:xsi="http://www.w3.org/2001/XMLSchema-instance" xmlns:context="http://www.springframework.org/schema/context" xmlns:mvc="http://www.springframework.org/schema/mvc" xsi:schemaLocation="http://www.springframework.org/schema/beans http://www.springframework.org/schema/beans/spring-beans.xsd http://www.springframework.org/schema/context http://www.springframework.org/schema/context/spring-context.xsd http://www.springframework.org/schema/mvc https://www.springframework.org/schema/mvc/spring-mvc.xsd"> <!-- 1.开启SpringMVC注解驱动 --> <mvc:annotation-driven /> <!-- 2.静态资源默认servlet配置--> <mvc:default-servlet-handler/> <!-- 3.配置jsp 显示ViewResolver视图解析器 --> <bean class="org.springframework.web.servlet.view.InternalResourceViewResolver "> <property name="viewClass" value="org.springframework.web.servlet.view.JstlView" /> <property name="prefix" value="/WEB-INF/jsp/" /> <property name="suffix" value=".jsp" /> </bean> <!-- 4.扫描web相关的bean --> <context:component-scan base-package="com.mixian.controller" /> </beans> -
Spring配置整合文件,applicationContext.xml
<?xml version="1.0" encoding="UTF-8"?> <beans xmlns="http://www.springframework.org/schema/beans"
                                              xmlns:xsi="http://www.w3.org/2001/XMLSchema-instance"
                                              xsi:schemaLocation="http://www.springframework.org/schema/beans
    http://www.springframework.org/schema/beans/spring-beans.xsd">
    <import resource="spring-dao.xml"/>
    <import resource="spring-service.xml"/>
    <import resource="spring-mvc.xml"/>
</beans>
7.4、功能实现
1、查询全部书籍
-
BookController类
@Controller @RequestMapping("/book") public class BookController { @Autowired @Qualifier("BookServiceImpl") private BookService bookService; @RequestMapping("/allBook") public String list(Model model) { List<Books> list = bookService.queryAllBook(); model.addAttribute("list", list); return "allBook"; } } -
首页index.jsp
<%@ page language="java" contentType="text/html; charset=UTF-8" pageEncoding="UTF-8" %> <!DOCTYPE HTML> <html> <head><title>首页</title> <style type="text/css"> a { text-decoration: none; color: black; font-size: 18px; } h3 { width: 180px; height: 38px; margin: 100px auto; text-align: center; line-height: 38px; background: deepskyblue; border-radius: 4px; } </style> </head> <body><h3><a href="${pageContext.request.contextPath}/book/allBook">点击进入列表 页</a></h3></body> </html> -
书籍列表页面allbook.jsp
<%@ taglib prefix="c" uri="http://java.sun.com/jsp/jstl/core" %>
<%@ page contentType="text/html;charset=UTF-8" language="java" %>
<html>
<head><title>书籍列表</title>
    <meta name="viewport" content="width=device-width, initial- scale=1.0"> <!-- 引入 Bootstrap -->
    <link href="https://cdn.bootcss.com/bootstrap/3.3.7/css/bootstrap.min.css" rel="stylesheet">
</head>
<body>
<div class="container">
    <div class="row clearfix">
        <div class="col-md-12 column">
            <div class="page-header"><h1><small>书籍列表 —— 显示所有书籍</small></h1></div>
        </div>
    </div>
    <div class="row">
        <div class="col-md-4 column"><a class="btn btn-primary"
                                        href="${pageContext.request.contextPath}/book/toAddBook">新增</a></div>
    </div>
    <div class="row clearfix">
        <div class="col-md-12 column">
            <table class="table table-hover table-striped">
                <thead>
                <tr>
                    <th>书籍编号</th>
                    <th>书籍名字</th>
                    <th>书籍数量</th>
                    <th>书籍详情</th>
                    <th>操作</th>
                </tr>
                </thead>
                <tbody><c:forEach var="book" items="${requestScope.get('list')}">
                    <tr>
                        <td>${book.getBookID()}</td>
                        <td>${book.getBookName()}</td>
                        <td>${book.getBookCounts()}</td>
                        <td>${book.getDetail()}</td>
                        <td>
                            <a href="${pageContext.request.contextPath}/book/toUpdateBook? id=${book.getBookID()}">更改</a>
                            | <a href="${pageContext.request.contextPath}/book/del/${book.getBookID()}"> 删除</a></td>
                    </tr>
                </c:forEach></tbody>
            </table>
        </div>
    </div>
</div>
2、添加书籍
-
BookController类
@RequestMapping("/toAddBook") public String toAddPaper() { return "addBook"; } @RequestMapping("/addBook") public String addPaper(Books books) { System.out.println(books); bookService.addBook(books); return "redirect:/book/allBook"; } -
添加书籍页面addBook.jsp
<%@ taglib prefix="c" uri="http://java.sun.com/jsp/jstl/core" %>
<%@ page contentType="text/html;charset=UTF-8" language="java" %>
<html>
<head><title>新增书籍</title>
    <meta name="viewport" content="width=device-width, initial- scale=1.0"> <!-- 引入 Bootstrap -->
    <link href="https://cdn.bootcss.com/bootstrap/3.3.7/css/bootstrap.min.css" rel="stylesheet">
</head>
<body>
<div class="container">
    <div class="row clearfix">
        <div class="col-md-12 column">
            <div class="page-header"><h1><small>新增书籍</small></h1></div>
        </div>
    </div>
    <form action="${pageContext.request.contextPath}/book/addBook" method="post"> 书籍名称:<input type="text"
                                                                                              name="bookName"><br><br><br>
        书籍数量:<input type="text" name="bookCounts"><br><br><br> 书籍详情:<input type="text" name="detail"><br><br><br> <input
                type="submit" value="添加"></form>
</div>
</body>
</html>
3、修改书籍
-
BookController类
@RequestMapping("/toUpdateBook") public String toUpdateBook(Model model, int id) { Books books = bookService.queryBookById(id); System.out.println(books); model.addAttribute("book", books); return "updateBook"; } @RequestMapping("/updateBook") public String updateBook(Model model, Books book) { System.out.println(book); bookService.updateBook(book); Books books = bookService.queryBookById(book.getBookID()); model.addAttribute("books", books); eturn "redirect:/book/allBook"; } -
修改书籍页面updateBook.jsp
<%@ taglib prefix="c" uri="http://java.sun.com/jsp/jstl/core" %>
<%@ page contentType="text/html;charset=UTF-8" language="java" %>
<html>
<head><title>修改信息</title>
    <meta name="viewport" content="width=device-width, initial- scale=1.0"> <!-- 引入 Bootstrap -->
    <link href="https://cdn.bootcss.com/bootstrap/3.3.7/css/bootstrap.min.css" rel="stylesheet">
</head>
<body>
<div class="container">
    <div class="row clearfix">
        <div class="col-md-12 column">
            <div class="page-header"><h1><small>修改信息</small></h1></div>
        </div>
    </div>
    <form action="${pageContext.request.contextPath}/book/updateBook" method="post"><input type="hidden" name="bookID"
                                                                                           value="${book.getBookID()}"/>
        书籍名称:<input type="text" name="bookName" value="${book.getBookName()}"/> 书籍数量:<input type="text"
                                                                                            name="bookCounts"
                                                                                            value="${book.getBookCounts()}"/>
        书籍详情:<input type="text" name="detail" value="${book.getDetail() }"/> <input type="submit" value="提交"/></form>
</div>
</body>
</html>
4、删除书籍
-
BookController类
@RequestMapping("/del/{bookId}")
public String deleteBook(@PathVariable("bookId") int id) {
    bookService.deleteBookById(id);
    return "redirect:/book/allBook";
}
8、拦截器
SpringMVC的处理器拦截器类似于Servlet开发中的过滤器Filter,用于对处理器进行预处理和后处理。
过滤器与拦截器的区别:拦截器是AOP思想的具体应用。
过滤器
-
servlet规范中的一部分,任何java web工程都可以使用
-
在url-pattern中配置了/*之后,可以对所有要访问的资源进行拦截
拦截器
-
拦截器是SpringMVC框架自己的,只有使用了SpringMVC框架的工程才能使用
-
拦截器只会拦截访问的控制器方法, 如果访问的是jsp/html/css/image/js是不会进行拦截的
8.1、自定义拦截器
public class MyInterceptor implements HandlerInterceptor {
    //在请求处理的方法之前执行
    //如果返回true执行下一个拦截器
    //如果返回false就不执行下一个拦截器
    public boolean preHandle(HttpServletRequest httpServletRequest, HttpServletResponse httpServletResponse, Object o) throws Exception {
        System.out.println("------------处理前------------");
        return true;
    }

    //在请求处理方法执行之后执行
    public void postHandle(HttpServletRequest httpServletRequest, HttpServletResponse httpServletResponse, Object o, ModelAndView modelAndView) throws Exception {
        System.out.println("------------处理后------------");
    }

    //在dispatcherServlet处理后执行,做清理工作.
    public void afterCompletion(HttpServletRequest httpServletRequest, HttpServletResponse httpServletResponse, Object o, Exception e) throws Exception {
        System.out.println("------------清理------------");
    }
}
在springmvc中配置拦截器
<mvc:interceptors>
    <mvc:interceptor>
        <!--/** 包括路径及其子路径-->
        <!--/admin/* 拦截的是/admin/add等等这种 , /admin/add/user不会被拦截- ->
 <!--/admin/** 拦截的是/admin/下的所有-->
        <mvc:mapping path="/**"/>
        <!--bean配置的就是拦截器-->
        <bean class="com.mixian.interceptor.MyInterceptor"/>
    </mvc:interceptor>
</mvc:interceptors>
8.2、验证用户是否登录
-
登录页面
<%@ page contentType="text/html;charset=UTF-8" language="java" %> <html> <head><title>Title</title></head> <h1>登录页面</h1> <hr> <body> <form action="${pageContext.request.contextPath}/user/login"> 用户名:<input type="text" name="username"> <br> 密码: <input type="password" name="pwd"> <br> <input type="submit" value="提交"></form> </body> </html> -
controller处理请求
@Controller @RequestMapping("/user") public class UserController { //跳转到登陆页面 @RequestMapping("/jumplogin") public String jumpLogin() throws Exception { return "login"; } //跳转到成功页面 @RequestMapping("/jumpSuccess") public String jumpSuccess() throws Exception { return "success"; } //登陆提交 @RequestMapping("/login") public String login(HttpSession session, String username, String pwd) throws Exception { // 向session记录用户身份信息 System.out.println("接收前端===" + username); session.setAttribute("user", username); return "success"; } //退出登陆 @RequestMapping("logout") public String logout(HttpSession session) throws Exception { // session 过 session.invalidate(); return "login"; } } -
成功页面
<%@ page contentType="text/html;charset=UTF-8" language="java" %> <html> <head><title>Title</title></head> <body><h1>登录成功页面</h1> <hr> ${user} <a href="${pageContext.request.contextPath}/user/logout">注销</a> </body> </html> -
index
<%@ page contentType="text/html;charset=UTF-8" language="java" %> <html> <head><title>$Title$</title></head> <body><h1>首页</h1> <hr> <%--登录--%> <a href="${pageContext.request.contextPath}/user/jumplogin">登录</a> <a href="${pageContext.request.contextPath}/user/jumpSuccess">成功页面 </a></body> </html> -
拦截器
public class LoginInterceptor implements HandlerInterceptor { public boolean preHandle(HttpServletRequest request, HttpServletResponse response, Object handler) throws ServletException, IOException { // 如果是登陆页面则放行 System.out.println("uri: " + request.getRequestURI()); if (request.getRequestURI().contains("login")) { return true; } HttpSession session = request.getSession(); // 如果用户已登陆也放行 if(session.getAttribute("user") != null) { return true; } // 用户没有登陆跳转到登陆页面 request.getRequestDispatcher("/WEB- INF/jsp/login.jsp").forward(request, response); return false; } public void postHandle(HttpServletRequest httpServletRequest, HttpServletResponse httpServletResponse, Object o, ModelAndView modelAndView) throws Exception { } public void afterCompletion(HttpServletRequest httpServletRequest, HttpServletResponse httpServletResponse, Object o, Exception e) throws Exception { } } -
springmvc中注册拦截器
<mvc:interceptors> <mvc:interceptor>
    <mvc:mapping path="/**"/>
    <bean id="loginInterceptor" class="com.mixian.interceptor.LoginInterceptor"/>
    </mvc:interceptor>
</mvc:interceptors>
9、文件上传和下载
文件上传是项目开发中最常见的功能之一 ,springMVC 可以很好的支持文件上传,但是SpringMVC上下文中默认没有装配MultipartResolver,因此默认情况下其不能处理文件上传工作。如果想使用Spring的文件上传功能,则需要在上下文中配置MultipartResolver。
前端表单要求:
- 为了能上传文件,必须将表单的method设置为POST,并将enctype设置为multipart/form-data。只有在这样的情况下,浏览器才会把用户选择的文件以二进制数据发送给服务器;
Apache Software Foundation发布了开源的Commons FileUpload组件,其很快成为Servlet/JSP程序员上传文件的最佳选择。
-
Servlet3.0规范已经提供方法来处理文件上传,但这种上传需要在Servlet中完成。
-
而Spring MVC则提供了更简单的封装。
-
Spring MVC为文件上传提供了直接的支持,这种支持是用即插即用的MultipartResolver实现的。
-
Spring MVC使用Apache Commons FileUpload技术实现了一个MultipartResolver实现类:CommonsMultipartResolver。因此,SpringMVC的文件上传还需要依赖Apache CommonsFileUpload的组件。
9.1、文件上传
导入依赖
<!--文件上传-->
<dependency>
    <groupId>commons-fileupload</groupId>
    <artifactId>commons-fileupload</artifactId>
    <version>1.3.3</version>
</dependency>
配置bean
<!--文件上传配置-->
<bean id="multipartResolver" class="org.springframework.web.multipart.commons.CommonsMultipartResolve r">
    <!-- 请求的编码格式,必须和jSP的pageEncoding属性一致,以便正确读取表单的内容, 默认为ISO-8859-1 -->
    <property name="defaultEncoding" value="utf-8"/>
    <!-- 上传文件大小上限,单位为字节(10485760=10M) -->
    <property name="maxUploadSize" value="10485760"/>
    <property name="maxInMemorySize" value="40960"/>
</bean>
- CommonsMultipartFile 的 常用方法:
- String getOriginalFilename():获取上传文件的原名
- InputStream getInputStream():获取文件流
- void transferTo(File dest):将上传文件保存到一个目录文件中
<form action="/upload" enctype="multipart/form-data" method="post">
    <input type="file" name="file"/>
    <input type="submit" value="upload">
</form>
@Controller public class FileController {
    //@RequestParam("file") 将name=file控件得到的文件封装成 CommonsMultipartFile 对象
    //批量上传CommonsMultipartFile则为数组即可
    @RequestMapping("/upload")
    public String fileUpload(@RequestParam("file") CommonsMultipartFile file , HttpServletRequest request) throws IOException {

        //获取文件名 : file.getOriginalFilename();
        String uploadFileName = file.getOriginalFilename();

        //如果文件名为空,直接回到首页!
        if ("".equals(uploadFileName)){
            return "redirect:/index.jsp";
        }
        System.out.println("上传文件名 : "+uploadFileName);

        //上传路径保存设置
        String path = request.getServletContext().getRealPath("/upload");

        //如果路径不存在,创建一个
        File realPath = new File(path); if (!realPath.exists()){
            realPath.mkdir();
        }
        System.out.println("上传文件保存地址:"+realPath);

        InputStream is = file.getInputStream(); //文件输入流
        OutputStream os = new FileOutputStream(new File(realPath,uploadFileName)); //文件输出流

        //读取写出
        int len=0;
        byte[] buffer = new byte[1024];
        while ((len=is.read(buffer))!=-1){
            os.write(buffer,0,len);
            os.flush();
        }
        os.close();is.close();
        return "redirect:/index.jsp";
    }
}
采用fifile.Transto 来保存上传的文件
/*
* 采用file.Transto 来保存上传的文件
*/ @RequestMapping("/upload2")
public String fileUpload2(@RequestParam("file") CommonsMultipartFile file, HttpServletRequest request) throws IOException {
    //上传路径保存设置
    String path = request.getServletContext().getRealPath("/upload");
    File realPath = new File(path);
    if (!realPath.exists()){
        realPath.mkdir();
    }

    //上传文件地址
    System.out.println("上传文件保存地址:"+realPath);

    //通过CommonsMultipartFile的方法直接写文件
    file.transferTo(new File(realPath +"/"+ file.getOriginalFilename()));
    return "redirect:/index.jsp";
}
9.2、文件下载
文件下载步骤:
-
设置 response 响应头
-
读取文件 -- InputStream
-
写出文件 -- OutputStream
-
执行操作
-
关闭流
@RequestMapping(value="/download")
public String downloads(HttpServletResponse response ,HttpServletRequest request) throws Exception{
    //要下载的图片地址
    String path = request.getServletContext().getRealPath("/upload");
    String fileName = "1.jpg";

    //1、设置response 响应头
    response.reset(); //设置页面不缓存,清空buffer
    response.setCharacterEncoding("UTF-8"); //字符编码
    response.setContentType("multipart/form-data"); //二进制传输数据
    //设置响应头
    response.setHeader("Content-Disposition", "attachment;fileName="+URLEncoder.encode(fileName, "UTF-8"));

    File file = new File(path,fileName);

    //2、 读取文件--输入流
    InputStream input=new FileInputStream(file);

    //3、 写出文件--输出流
    OutputStream out = response.getOutputStream();

    byte[] buff =new byte[1024];
    int index=0;
    //4、执行 写出操作
    while((index= input.read(buff))!= -1){
        out.write(buff, 0, index);
        out.flush();
    }out.close();
    input.close();
    return null;
}
标签:return,RequestMapping,SpringMVC,视图,Controller,public,String 来源: https://www.cnblogs.com/cherish-0/p/16655357.html
本站声明: 1. iCode9 技术分享网(下文简称本站)提供的所有内容,仅供技术学习、探讨和分享; 2. 关于本站的所有留言、评论、转载及引用,纯属内容发起人的个人观点,与本站观点和立场无关; 3. 关于本站的所有言论和文字,纯属内容发起人的个人观点,与本站观点和立场无关; 4. 本站文章均是网友提供,不完全保证技术分享内容的完整性、准确性、时效性、风险性和版权归属;如您发现该文章侵犯了您的权益,可联系我们第一时间进行删除; 5. 本站为非盈利性的个人网站,所有内容不会用来进行牟利,也不会利用任何形式的广告来间接获益,纯粹是为了广大技术爱好者提供技术内容和技术思想的分享性交流网站。