标签:return SpringBoot shiro 整合 import org public Shiro user
11、SpringBoot整合Shiro
11.1、什么是Shiro
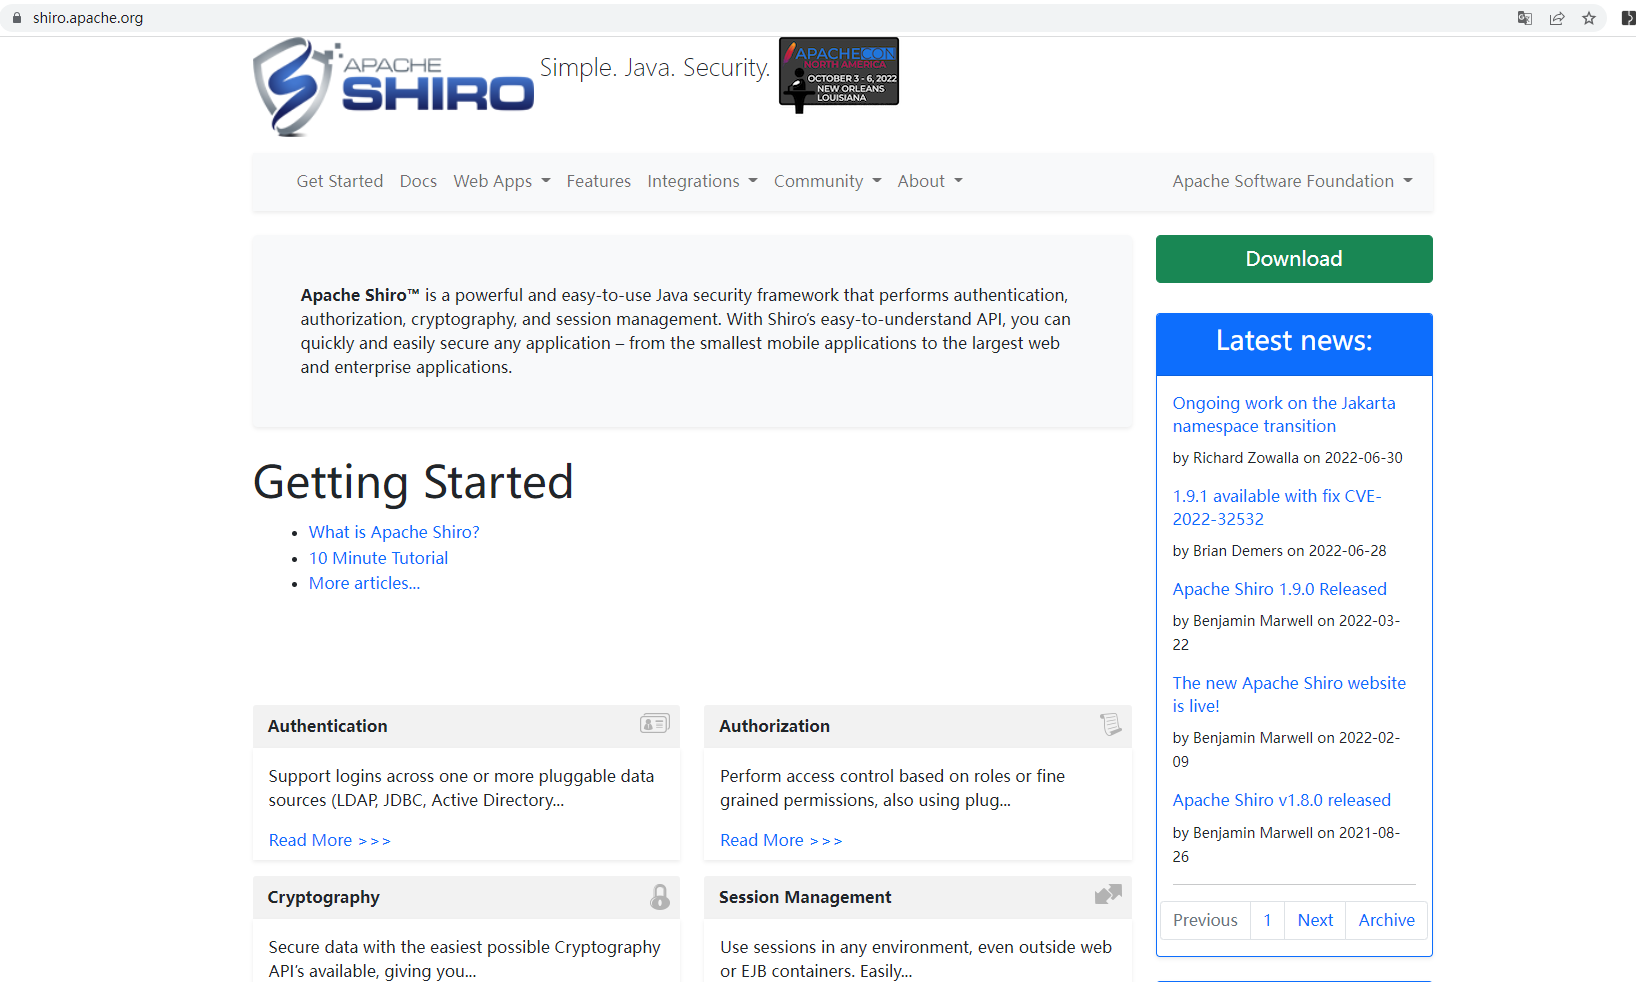
- Apache Shiro 是一个Java 的安全(权限)框架。
- Shiro 可以非常容易的开发出足够好的应用,其不仅可以用在JavaSE环境,也可以用在JavaEE环境。
- Shiro可以完成,认证,授权,加密,会话管理,Web集成,缓存等。
- 下载地址:http://shiro.apache.org/

11.2、有哪些功能?

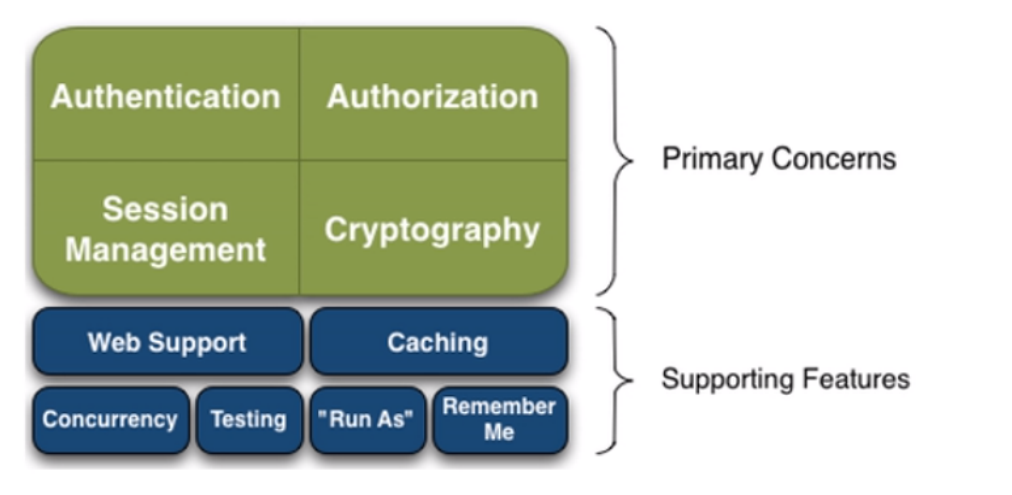
- Authentication:身份认证、登录,验证用户是不是拥有相应的身份;
- Authorization:授权,即权限验证,验证某个已认证的用户是否拥有某个权限,即判断用户能否进行什么操作,如:验证某个用户是否拥有某个角色,或者细粒度的验证某个用户对某个资源是否具有某个权限!
- Session Manager:会话管理,即用户登录后就是第一次会话,在没有退出之前,它的所有信息都在会话中;会话可以是普通的JavaSE环境,也可以是Web环境;
- Cryptography:加密,保护数据的安全性,如密码加密存储到数据库中,而不是明文存储;
- Web Support:Web支持,可以非常容易的集成到Web环境;
- Caching:缓存,比如用户登录后,其用户信息,拥有的角色、权限不必每次去查,这样可以提高效率
- Concurrency:Shiro支持多线程应用的并发验证,即,如在一个线程中开启另一个线程,能把权限自动的传播过去
- Testing:提供测试支持; Run As:允许一个用户假装为另一个用户(如果他们允许)的身份进行访问;
- Remember Me:记住我,这个是非常常见的功能,即一次登录后,下次再来的话不用登录了
11.3、Shiro架构(外部)
从外部来看Shiro,即从应用程序角度来观察如何使用shiro完成工作:

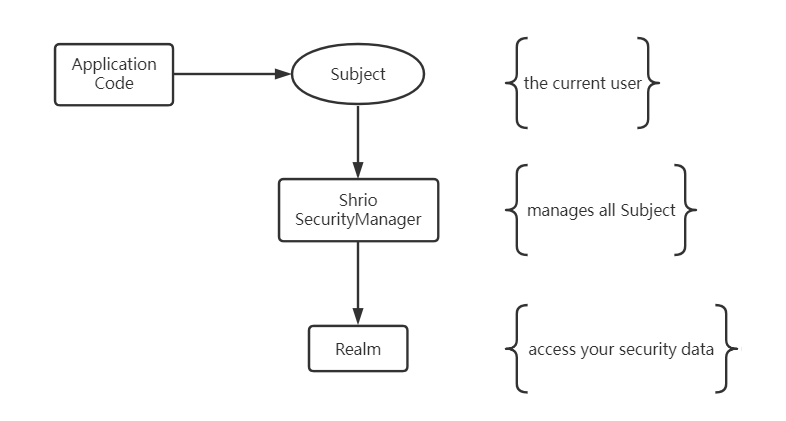
- subject: 应用代码直接交互的对象是Subject,也就是说Shiro的对外API核心就是Subject,Subject代表了当前的用户,这个用户不一定是一个具体的人,与当前应用交互的任何东西都是Subject,如网络爬虫,机器人等,与Subject的所有交互都会委托给SecurityManager;Subject其实是一个门面,SecurityManageer 才是实际的执行者
- SecurityManager:安全管理器,即所有与安全有关的操作都会与SercurityManager交互,并且它管理着所有的Subject,可以看出它是Shiro的核心,它负责与Shiro的其他组件进行交互,它相当于SpringMVC的DispatcherServlet的角色
- Realm:Shiro从Realm获取安全数据(如用户,角色,权限),就是说SecurityManager 要验证用户身份,那么它需要从Realm 获取相应的用户进行比较,来确定用户的身份是否合法;也需要从Realm得到用户相应的角色、权限,进行验证用户的操作是否能够进行,可以把Realm看成DataSource;
11.4、快速实践
查看官网文档快速入门:http://shiro.apache.org/tutorial.html
GitHub上的quickstart:https://github.com/apache/shiro/tree/master/samples/quickstart/
阅读代码
1、类的描述
/**
* Simple Quickstart application showing how to use Shiro's API.
* 简单的快速启动应用程序,演示如何使用Shiro的API。
*/
2、通过工厂模式创建SecurityManager的实例对象
/*
  The easiest way to create a Shiro SecurityManager with configuredrealms, users, roles and permissions is to use the simple INI config.We'll do that by using a factory that can ingest a .ini file andreturn a SecurityManager instance:

  使用类路径根目录下的shiro.ini文件
  Use the shiro.ini file at the root of the classpath(file: and url: prefixes load from files and urls respectively):
*/
Factory<SecurityManager> factory = new
IniSecurityManagerFactory("classpath:shiro.ini");
SecurityManager securityManager = factory.getInstance();

/*
  for this simple example quickstart, make the SecurityManager accessible as a JVM singleton. Most applications wouldn't do this and instead rely on their container configuration or web.xml for webapps. That is outside the scope of this simple quickstart, so we'll just do the bare minimum so you can continue to get a feel for things.
*/
SecurityUtils.setSecurityManager(securityManager);

// 现在已经建立了一个简单的Shiro环境,让我们看看您可以做什么:
// Now that a simple Shiro environment is set up, let's see what you can do:
3、获取当前的Subject
// get the currently executing user: 获取当前正在执行的用户
Subject currentUser = SecurityUtils.getSubject();
4、session的操作
// 用会话做一些事情(不需要web或EJB容器!!!)
// Do some stuff with a Session (no need for a web or EJB container!!!)
Session session = currentUser.getSession(); //获得session
session.setAttribute("someKey", "aValue"); //设置Session的值!
String value = (String) session.getAttribute("someKey"); //从session中获取值
if (value.equals("aValue")) { //判断session中是否存在这个值!
	log.info("==Retrieved the correct value! [" + value + "]");
}
5、用户认证功能
// 测试当前的用户是否已经被认证,即是否已经登录!
// let's login the current user so we can check against roles and permissions:
if (!currentUser.isAuthenticated()) { // isAuthenticated();是否认证
	//将用户名和密码封装为 UsernamePasswordToken ;
	UsernamePasswordToken token = new UsernamePasswordToken("lonestarr", "vespa");
	token.setRememberMe(true); //记住我功能
	try {
    currentUser.login(token); //执行登录,可以登录成功的!
    } catch (UnknownAccountException uae) { //如果没有指定的用户,则UnknownAccountException异常
    	log.info("There is no user with username of " + token.getPrincipal());
    } catch (IncorrectCredentialsException ice) { //密码不对的异常!
    	log.info("Password for account " + token.getPrincipal() + " was incorrect!");
    } catch (LockedAccountException lae) { //用户被锁定的异常
    	log.info("The account for username " + token.getPrincipal() + " is locked. " +
"Please contact your administrator to unlock it.");
	}
	// ... catch more exceptions here (maybe custom ones specific to your application?
	catch (AuthenticationException ae) { //认证异常,上面的异常都是它的子类
	//unexpected condition? error?
	}
}

//说出他们是谁:
//say who they are:
//打印他们的标识主体(在本例中为用户名):
//print their identifying principal (in this case, a username):
log.info("User [" + currentUser.getPrincipal() + "] logged in successfully.");
6、角色检查
//test a role:
//是否存在某一个角色
if (currentUser.hasRole("schwartz")) {
	log.info("May the Schwartz be with you!");
} else {
	log.info("Hello, mere mortal.");
}
7、权限检查,粗粒度
//测试用户是否具有某一个权限,行为
//test a typed permission (not instance-level)
if (currentUser.isPermitted("lightsaber:wield")) {
	log.info("You may use a lightsaber ring. Use it wisely.");
} else {
	log.info("Sorry, lightsaber rings are for schwartz masters only.");
}
8、权限检查,细粒度
//测试用户是否具有某一个权限,行为,比上面更加的具体!
//a (very powerful) Instance Level permission:
if (currentUser.isPermitted("winnebago:drive:eagle5")) {
	log.info("You are permitted to 'drive' the winnebago with license plate (id) 'eagle5'. " + "Here are the keys - have fun!");
} else {
	log.info("Sorry, you aren't allowed to drive the 'eagle5' winnebago!");
}
9、注销操作
//执行注销操作!
//all done - log out!
currentUser.logout();
10、退出系统
System.exit(0);
11.5、集成Shiro
11.5.1、环境搭建
1、搭建一个SpringBoot项目、选中web模块和thymeleaf模块即可!
2、导入相关依赖(后续可能会用到的)
<!--
  Subject 用户
  SecurityManager 管理所有用户
  Realm 连接数据
 -->
<dependencies>
    <!-- lombok -->
    <dependency>
        <groupId>org.projectlombok</groupId>
        <artifactId>lombok</artifactId>
        <version>1.18.24</version>
    </dependency>
    <!-- mysql -->
    <dependency>
        <groupId>mysql</groupId>
        <artifactId>mysql-connector-java</artifactId>
        <version>8.0.28</version>
    </dependency>
    <!-- mybatis -->
    <dependency>
        <groupId>org.mybatis.spring.boot</groupId>
        <artifactId>mybatis-spring-boot-starter</artifactId>
        <version>2.2.2</version>
    </dependency>
    <!-- log4j -->
    <dependency>
        <groupId>log4j</groupId>
        <artifactId>log4j</artifactId>
        <version>1.2.17</version>
    </dependency>
    <!-- druid -->
    <dependency>
        <groupId>com.alibaba</groupId>
        <artifactId>druid</artifactId>
        <version>1.2.11</version>
    </dependency>
    <!-- shiro整合spring的包 -->
    <dependency>
        <groupId>org.apache.shiro</groupId>
        <artifactId>shiro-spring</artifactId>
        <version>1.9.1</version>
    </dependency>
    <!-- 整合thymeleaf-shiro -->
    <dependency>
        <groupId>com.github.theborakompanioni</groupId>
        <artifactId>thymeleaf-extras-shiro</artifactId>
        <version>2.1.0</version>
    </dependency>
    <!-- thymeleaf模板引擎 -->
    <dependency>
        <groupId>org.springframework.boot</groupId>
        <artifactId>spring-boot-starter-thymeleaf</artifactId>
    </dependency>
    <!-- web -->
    <dependency>
        <groupId>org.springframework.boot</groupId>
        <artifactId>spring-boot-starter-web</artifactId>
    </dependency>

    <dependency>
        <groupId>org.springframework.boot</groupId>
        <artifactId>spring-boot-starter-test</artifactId>
        <scope>test</scope>
    </dependency>
</dependencies>
3、在resources下的templates下创建index.html
<!DOCTYPE html>
<html lang="en"xmlns:th="http://www.thymeleaf.org">
<head>
<meta charset="UTF-8">
<title>Title</title>
</head>
<body>
    <h1>首页</h1>
    <p th:text="${msg}"></p>
</body>
</html>
4、编写controller进行访问测试
import org.springframework.stereotype.Controller;
import org.springframework.ui.Model;
import org.springframework.web.bind.annotation.RequestMapping;

@Controller
public class MyController {

    @RequestMapping({"/","/index"})
    public String toIndex(Model model){
        model.addAttribute("msg","hello,Shiro");
        return "index";
    }
}
5、测试访问首页!
11.5.2、整合Shiro
回顾核心API:
Subject:用户主体
SecurityManager:安全管理器
Realm:Shiro 连接数据
步骤:
1、导入Shiro 和 spring整合的依赖
2、编写在config包下编写ShiroConfig配置类
import org.springframework.context.annotation.Configuration;

//声明为配置类
@Configuration
public class ShiroConfig {

    //创建 ShiroFilterFactoryBean

    //创建 DefaultWebSecurityManager

    //创建 realm 对象

}
3、因为需要依次调用下面的类,所以需要从realm开始
4、自定义一个 realm 的类,用来编写一些查询的方法,或者认证与授权的逻辑
import org.apache.shiro.authc.AuthenticationException;
import org.apache.shiro.authc.AuthenticationInfo;
import org.apache.shiro.authc.AuthenticationToken;
import org.apache.shiro.authz.AuthorizationInfo;
import org.apache.shiro.realm.AuthorizingRealm;
import org.apache.shiro.subject.PrincipalCollection;

//自定义Realm
public class UserRealm extends AuthorizingRealm {

    //执行授权逻辑
    @Override
    protected AuthorizationInfo doGetAuthorizationInfo(PrincipalCollection principals) {
        System.out.println("执行了=>授权逻辑PrincipalCollection");
        return null;
    }

    //执行认证逻辑
    @Override
    protected AuthenticationInfo doGetAuthenticationInfo(AuthenticationToken token) throws AuthenticationException {
        System.out.println("执行了=>认证逻辑AuthenticationToken");
        return null;
    }
}
5、将这个类注册到ShiroConfig配置类的Bean中!
//声明为配置类
@Configuration
public class ShiroConfig {

    //创建 ShiroFilterFactoryBean

    //创建 DefaultWebSecurityManager

    //创建 realm 对象
    @Bean
    public UserRealm userRealm(){
    	return new UserRealm();
    }
}
6、创建 DefaultWebSecurityManager
//创建 DefaultWebSecurityManager
@Bean(name = "securityManager")
public DefaultWebSecurityManager getDefaultWebSecurityManager(@Qualifier("userRealm")UserRealm userRealm){
    DefaultWebSecurityManager securityManager = new DefaultWebSecurityManager();
    //关联Realm
    securityManager.setRealm(userRealm);
    return securityManager;
}
7、创建 ShiroFilterFactoryBean
//创建 ShiroFilterFactoryBean
@Bean
public ShiroFilterFactoryBean getShiroFilterFactoryBean(@Qualifier("securityManager")DefaultWebSecurityManager securityManager){
    ShiroFilterFactoryBean shiroFilterFactoryBean = new ShiroFilterFactoryBean();
    //设置安全管理器
    shiroFilterFactoryBean.setSecurityManager(securityManager);
    return shiroFilterFactoryBean;
}
11.5.3、ShiroConfig完整配置
ShiroConfig.java
import at.pollux.thymeleaf.shiro.dialect.ShiroDialect;
import org.apache.shiro.spring.web.ShiroFilterFactoryBean;
import org.apache.shiro.web.mgt.DefaultWebSecurityManager;
import org.springframework.beans.factory.annotation.Qualifier;
import org.springframework.context.annotation.Bean;
import org.springframework.context.annotation.Configuration;

import java.util.LinkedHashMap;
import java.util.Map;

@Configuration
public class ShiroConfig {

    // ShiroFilterFactoryBean:3
    @Bean
    public ShiroFilterFactoryBean getShiroFilterFactoryBean(@Qualifier("securityManager") DefaultWebSecurityManager securityManager){
        ShiroFilterFactoryBean bean = new ShiroFilterFactoryBean();
        // 设置安全管理器
        bean.setSecurityManager(securityManager);
        return bean;
    }

    // DafaultWebSecurityManager:2
    // @Qualifier("userRealm")的作用是指定bean
    @Bean("securityManager")
    public DefaultWebSecurityManager getdefaultWebSecurityManager(@Qualifier("userRealm") UserRealm userRealm){
        DefaultWebSecurityManager securityManager = new DefaultWebSecurityManager();
        // 关联 UserRealm
        securityManager.setRealm(userRealm);
        return securityManager;
    }

    // 创建 realm 对象,需要自定义:1
    // 定义UserRealm,继承AuthorizingRealm,然后实现授权认证方法
    @Bean(name = "userRealm") // name可以不写,默认为类名
    public UserRealm userRealm(){
        return new UserRealm();
    }
}
11.5.4、页面拦截实现
1、编写两个页面、在templates目录下新建一个 user 目录,添加add.html和update.html
<body>
	<h1>add</h1>
</body
<body>
	<h1>update</h1>
</body
2、编写跳转到页面的controller
@RequestMapping("/user/add")
public String toAdd(){
    return "/user/add";
}

@RequestMapping("/user/update")
public String toUpdate(){
    return "/user/update";
}
3、在index页面上,增加跳转链接
<a th:href="@{/user/add}">add</a> | <a th:href="@{/user/update}">update</a>
4、测试页面跳转
5、添加Shiro的内置过滤器
@Bean
public ShiroFilterFactoryBean getShiroFilterFactoryBean(@Qualifier("securityManager") DefaultWebSecurityManager securityManager){
    ShiroFilterFactoryBean bean = new ShiroFilterFactoryBean();
    // 设置安全管理器
    bean.setSecurityManager(securityManager);

    /*
            anon:无需认证就可以访问
            authc:必须认证了才可以访问
            user:必须拥有 记住我 功能才能用
            perms:拥有对某个资源的权限才能访问
            role:拥有某个角色权限才能访问
         */
    // 拦截
    Map<String, String> filterMap = new LinkedHashMap<>();

    // 可以匹配,也可以指定
    filterMap.put("/user/*", "authc");
    bean.setFilterChainDefinitionMap(filterMap);

    return bean;
}
6、启动测试,拦截成功!但是点击后会跳转到一个login页面,这个不是我们想要的效果,需要自定义一个登录页面!
7、编写Login登录页面
<!DOCTYPE html>
<html lang="en" xmlns:th="http://www.thymeleaf.org">
<head>
    <meta charset="UTF-8">
    <title>Title</title>
</head>
<body>
    <h3>登录</h3>
    <p th:text="${msg}" style="color: red;"></p>
    <form th:action="@{/login}" method="post">
        <p><input type="text" name="username"></p>
        <p><input type="text" name="password"></p>
        <p><input type="submit" value="提交"></p>
    </form>
</body>
</html>
8、编写跳转的controller
@RequestMapping("/toLogin")
public String toLogin(){
	return "login";
}
9、在ShiroConfig中的ShiroFilterFactoryBean() 方法下配置
//修改到要跳转的login页面;
bean.setLoginUrl("/toLogin");
10、再次测试,成功的跳转到了指定的Login页面
11.5.5、登录认证操作
1、编写登录的controller
@RequestMapping("login")
    public String login(String username, String password, Model model){
        // 获取当前用户
        Subject subject = SecurityUtils.getSubject();
        // 可以设置Session
//        Session session = SecurityUtils.getSubject().getSession();
        // 封装用户的登录数据
        UsernamePasswordToken token = new UsernamePasswordToken(username, password);
        try {
            subject.login(token); // 执行登录方法,如果没有异常就登录成功。
            return "index";
        } catch (UnknownAccountException e) { //用户名不存在
            model.addAttribute("msg", "用户名错误");
            return "login";
        } catch (IncorrectCredentialsException e){ // 密码不存在
            model.addAttribute("msg", "密码错误");
            return "login";
        }
    }
2、在 UserRealm 中编写用户认证的判断逻辑
// 认证
@Override
protected AuthenticationInfo doGetAuthenticationInfo(AuthenticationToken token) throws AuthenticationException {
    System.out.println("执行了->认证doGetAuthenticationInfo");

    UsernamePasswordToken userToken = (UsernamePasswordToken) token;
    // 用户名, 密码。 数据从数据库取
    User user = userService.queryUserByName(userToken.getUsername());
    if(user == null){ // 没有这个人
        return null;
    }

    // 可以加密: MD5,MD5盐值加密(md5加密之后在加上一窜用户名)
    // 密码认证, shiro自己做。 个AuthenticationInfo实现类SimpleAuthenticationInfo
    // 第一个参数传递当前用户对象,否则授权的时候拿不到
    return new SimpleAuthenticationInfo(user, user.getPwd() ,"");
}
3、 测试实现登录的认证操作!
11.5.6、整合数据库
1、导入相关依赖,mysql-connector-java,mybatis-spring-boot-starter,log4j,druid
2、编写数据库配置文件 application.yaml
spring:
  # 配置数据源
  datasource:
    username: root # 用户名
    password: 123456 # 密码
    # ?serverTimezone=UTC解决时区的报错
    url: jdbc:mysql://localhost:3306/mybatistest?useSSL=true&useUnicode=true&characterEncoding=utf-8&serverTimezone=GMT%2B8
    driver-class-name: com.mysql.cj.jdbc.Driver # mysql驱动,新版用cj
    type: com.alibaba.druid.pool.DruidDataSource # 自定义数据源

    #Spring Boot 默认是不注入这些属性值的,需要自己绑定
    #druid 数据源专有配置
    initialSize: 5
    minIdle: 5
    maxActive: 20
    maxWait: 60000
    timeBetweenEvictionRunsMillis: 60000
    minEvictableIdleTimeMillis: 300000
    validationQuery: SELECT 1 FROM DUAL
    testWhileIdle: true
    testOnBorrow: false
    testOnReturn: false
    poolPreparedStatements: true

    #配置监控统计拦截的filters,stat:监控统计、log4j:日志记录、wall:防御sql注入
    #如果允许时报错  java.lang.ClassNotFoundException: org.apache.log4j.Priority
    #则导入 log4j 依赖即可,Maven 地址:https://mvnrepository.com/artifact/log4j/log4j
    filters: stat,wall,log4j
    maxPoolPreparedStatementPerConnectionSize: 20
    useGlobalDataSourceStat: true
    connectionProperties: druid.stat.mergeSql=true;druid.stat.slowSqlMillis=500
3、编写mybatis的配置
# 整合mybatis
mybatis:
  type-aliases-package: com.yzh.pojo
  mapper-locations: classpath:mapper/*Mapper.xml
4、编写实体类,引入Lombok依赖
@Data
@AllArgsConstructor
@NoArgsConstructor
public class User {
    private Integer id; // ID
    private String name; // 用户名
    private String pwd; // 密码
    private String perms; // 权限
}
5、编写Mapper接口
@Repository
@Mapper
public interface UserMapper {
	public User queryUserByName(String name);
}
6、编写Mapper配置文件
<?xml version="1.0" encoding="UTF-8" ?>
<!DOCTYPE mapper
    PUBLIC "-//mybatis.org//DTD Mapper 3.0//EN"
    "http://mybatis.org/dtd/mybatis-3-mapper.dtd">
<mapper namespace="com.kuang.mapper.UserMapper">
    <select id="queryUserByName" resultType="User">
        select * from user where name = #{name}
    </select>
</mapper>
7、编写UserService层和对应实现类
public interface UserService {
	public User queryUserByName(String name);
}
import com.kuang.mapper.UserMapper;
import com.kuang.pojo.User;
import org.springframework.beans.factory.annotation.Autowired;
import org.springframework.stereotype.Service;

@Service
public class UserServiceImpl implements UserService {

    @Autowired
    UserMapper userMapper;

    @Override
    public User queryUserByName(String name) {
    	return userMapper.queryUserByName(name);
    }
}
8、测试mybatis,成功查询
@SpringBootTest
class ShiroSpringbootApplicationTests {

	@Autowired
	private UserServiceImpl userService;

	@Test
	void contextLoads() {
		List<User> users = userService.queryUserList();
		System.out.println(users);
	}
}
11.5.7、用户授权操作
使用shiro的过滤器来拦截请求!
1、在 ShiroConfig中的ShiroFilterFactoryBean 中添加过滤器
// 授权,正常情况下,没有授权会跳到未授权页面
filterMap.put("/user/add", "perms[user:add]");
filterMap.put("/user/update", "perms[user:update]");
2、启动测试一下,访问add,发现未授权错误!
注意:当我们实现权限拦截后,shiro会自动跳转到未授权的页面,但我们没有这个页面,所以401错误
3、配置一个未授权的提示的页面,增加一个controller提示
@RequestMapping("/noauth")
@ResponseBody
public String noAuth(){
	return "未经授权不能访问此页面";
}
然后再 shiroFilterFactoryBean 中配置一个未授权的请求页面!
// 设置未授权页面
bean.setUnauthorizedUrl("/noauth");
4、测试,没有授权,可以跳转到指定的未授权页面!
11.5.8、Shiro授权
1、在UserRealm 中添加授权的逻辑,增加授权的字符串!
// 授权
@Override
protected AuthorizationInfo doGetAuthorizationInfo(PrincipalCollection principalCollection) {
    System.out.println("执行了->授权doGetAuthorizationInfo");
    SimpleAuthorizationInfo info = new SimpleAuthorizationInfo();
    //        info.addStringPermission("user:add");

    // 拿到当前登录的对象
    Subject subject = SecurityUtils.getSubject();
    User currentUser = (User) subject.getPrincipal(); //拿到User对象

    // 设置当前用户的权限
    info.addStringPermission(currentUser.getPerms());
    return info;
}
2、自定义的授权认证中,获取登录的用户,从而实现动态认证授权操作!(在用户登录授权的时候,将用户放在 Principal 中)
return new SimpleAuthenticationInfo(user, user.getPwd(), "")
然后再授权的地方获得这个用户,从而获得它的权限
// 拿到当前登录的对象
Subject subject = SecurityUtils.getSubject();
User currentUser = (User) subject.getPrincipal(); //拿到User对象

// 设置当前用户的权限
info.addStringPermission(currentUser.getPerms());
3、启动项目,登录不同的账户进行测试权限
11.5.9、UserRealm完整配置
UserRealm.java
import com.yzh.pojo.User;
import com.yzh.service.UserServiceImpl;
import org.apache.shiro.SecurityUtils;
import org.apache.shiro.authc.*;
import org.apache.shiro.authz.AuthorizationInfo;
import org.apache.shiro.authz.SimpleAuthorizationInfo;
import org.apache.shiro.realm.AuthorizingRealm;
import org.apache.shiro.subject.PrincipalCollection;
import org.apache.shiro.subject.Subject;
import org.springframework.beans.factory.annotation.Autowired;

// 自定义的 UserRealm extends AuthorizingRealm
public class UserRealm extends AuthorizingRealm {

    @Autowired
    private UserServiceImpl userService;

    // 授权
    @Override
    protected AuthorizationInfo doGetAuthorizationInfo(PrincipalCollection principalCollection) {
        System.out.println("执行了->授权doGetAuthorizationInfo");
        SimpleAuthorizationInfo info = new SimpleAuthorizationInfo();
//        info.addStringPermission("user:add");

        // 拿到当前登录的对象
        Subject subject = SecurityUtils.getSubject();
        User currentUser = (User) subject.getPrincipal(); //拿到User对象

        // 设置当前用户的权限
        info.addStringPermission(currentUser.getPerms());
        return info;
    }

    // 认证
    @Override
    protected AuthenticationInfo doGetAuthenticationInfo(AuthenticationToken token) throws AuthenticationException {
        System.out.println("执行了->认证doGetAuthenticationInfo");

        UsernamePasswordToken userToken = (UsernamePasswordToken) token;
        // 用户名, 密码。 数据从数据库取
        User user = userService.queryUserByName(userToken.getUsername());
        if(user == null){ // 没有这个人
            return null;
        }

        // 可以加密: MD5,MD5盐值加密(md5加密之后在加上一窜用户名)
        // 密码认证, shiro自己做。
        // 第一个参数传递当前用户对象,否则授权的时候拿不到
        return new SimpleAuthenticationInfo(user, user.getPwd() ,"");
    }
}
11.6、整合Thymeleaf
根据权限展示不同的前端页面
1、添加Maven的依赖,thymeleaf-extras-shiro;
2、配置一个shiro的Dialect ,在ShiroConfig的配置中增加一个Bean
// 整合ShiroDialect 用来整合Shiro thymeleaf
@Bean
public ShiroDialect getShiroDialect(){
    return new ShiroDialect();
}
3、修改前端index.html的配置
<body>
    <h1>首页</h1>
    <h3 shiro:notAuthenticated="">
        <a th:href="@{/toLogin}">登录</a>
    </h3>
    <h3 th:text="${msg}"></h3>
    <hr>
    <p shiro:hasPermission="user:add"><a th:href="@{/user/add}">增加</a></p>
    <p shiro:hasPermission="user:update"><a th:href="@{/user/update}">修改</a></p>
    <h3 shiro:authenticated="">
        <a th:href="@{/loginout}">退出</a>
    </h3>
</body>
4、测试登录用户和登录退出按钮的权限是否正常显示。
END
标签:return,SpringBoot,shiro,整合,import,org,public,Shiro,user 来源: https://www.cnblogs.com/lyluoye/p/16643398.html
本站声明: 1. iCode9 技术分享网(下文简称本站)提供的所有内容,仅供技术学习、探讨和分享; 2. 关于本站的所有留言、评论、转载及引用,纯属内容发起人的个人观点,与本站观点和立场无关; 3. 关于本站的所有言论和文字,纯属内容发起人的个人观点,与本站观点和立场无关; 4. 本站文章均是网友提供,不完全保证技术分享内容的完整性、准确性、时效性、风险性和版权归属;如您发现该文章侵犯了您的权益,可联系我们第一时间进行删除; 5. 本站为非盈利性的个人网站,所有内容不会用来进行牟利,也不会利用任何形式的广告来间接获益,纯粹是为了广大技术爱好者提供技术内容和技术思想的分享性交流网站。
