标签:0s ok 安装 gitlab 汉化 linux node1 root
gitlab的安装
首先在网上下载好任意版本gitlab的rpm包
推荐下面的地址:
https://mirrors.tuna.tsinghua.edu.cn/gitlab-ce/yum/el7/gitlab-ce-8.8.5-ce.1.el7.x86_64.rpm
[root@linux-node1 ~]# rz -E
rz waiting to receive.
[root@linux-node1 ~]# ls
anaconda-ks.cfg gitlab-ce-8.8.5-ce.1.el7.x86_64.rpm
[root@linux-node1 ~]# rpm -ivh gitlab-ce-8.8.5-ce.1.el7.x86_64.rpm
#安装
Preparing... ################################# [100%]
Updating / installing...
1:gitlab-ce-8.8.5-ce.1.el7 ################################# [100%]
gitlab: Thank you for installing GitLab!
gitlab: To configure and start GitLab, RUN THE FOLLOWING COMMAND:
sudo
gitlab-ctl reconfigure #配置并启动gitlab
gitlab: GitLab should be reachable at http://linux-node1 默认的访问地址
gitlab: Otherwise configure GitLab for your system by editing /etc/gitlab/gitlab.rb file #gitlab的配置文件,修改之后需要重新gitlab-ctl reconfigure
gitlab: And running reconfigure again.
gitlab:
gitlab: For a comprehensive list of configuration options please see the Omnibus GitLab readme
gitlab: https://gitlab.com/gitlab-org/omnibus-gitlab/blob/master/README.md
gitlab:
It looks like GitLab has not been configured yet; skipping the upgrade script.
[root@linux-node1 ~]#
gitlab的配置
这里我先修改下配置文件
vim /etc/gitlab/gitlab.rb #修改配置文件
修改结果如下:
[root@linux-node1 ~]# grep -n "^[a-Z]" /etc/gitlab/gitlab.rb
11:external_url 'http://192.168.56.11'
[root@linux-node1 ~]# gitlab-ctl reconfigure #配置并启动gitlab
打开浏览器输入http://192.168.56.11 #192.168.56.11我的本机ip
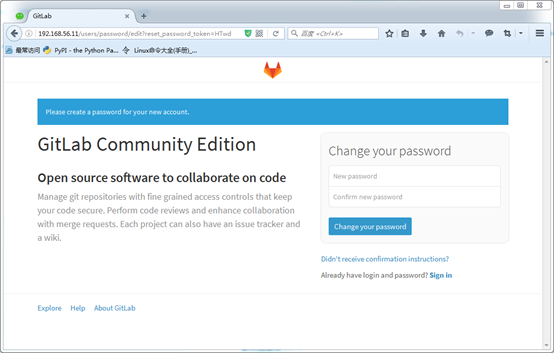
第一次登录要求设置root密码
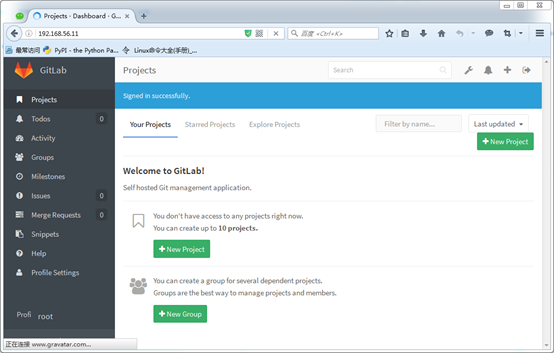
登录成功之后,是这样的
gitlab的汉化:
[root@linux-node1 ~]# rz
[root@linux-node1 ~]# ls
anaconda-ks.cfg gitlab-ce-8.8.5-ce.1.el7.x86_64.rpm gitlabhq.tar.gz
[root@linux-node1 ~]# tar xf gitlabhq.tar.gz
[root@linux-node1 ~]# ls
anaconda-ks.cfg gitlab-ce-8.8.5-ce.1.el7.x86_64.rpm gitlabhq gitlabhq.tar.gz
###关于这个也可以直接git clone git clone https://github.com/larryli/gitlabhq.git
[root@linux-node1 ~]# cp -r /opt/gitlab/embedded/service/gitlab-rails{,.ori}
[root@linux-node1 ~]# gitlab-ctl stop
ok: down: gitlab-workhorse: 1s, normally up
ok: down: logrotate: 0s, normally up
ok: down: nginx: 0s, normally up
ok: down: postgresql: 1s, normally up
ok: down: redis: 0s, normally up
ok: down: sidekiq: 0s, normally up
ok: down: unicorn: 0s, normally up
[root@linux-node1 ~]# \cp -rf /root/gitlabhq/* /opt/gitlab/embedded/service/gitlab-rails/
cp: cannot overwrite non-directory '/opt/gitlab/embedded/service/gitlab-rails/log' with directory '/root/gitlabhq/log'
cp: cannot overwrite non-directory '/opt/gitlab/embedded/service/gitlab-rails/tmp' with directory '/root/gitlabhq/tmp'
#这里的错误,忽略,因为之前已经设置gitlab的root密码了
[root@linux-node1 ~]# gitlab-ctl start
ok: run: gitlab-workhorse: (pid 25910) 0s
ok: run: logrotate: (pid 25914) 0s
ok: run: nginx: (pid 25920) 1s
ok: run: postgresql: (pid 25925) 0s
ok: run: redis: (pid 25933) 1s
ok: run: sidekiq: (pid 25937) 0s
ok: run: unicorn: (pid 25941) 0s
汉化完成之后的效果

注意事项
汉化之后,不要进行版本升级,很容易出现502!切记!还有生产环境中,尽量用域名,迁移方便
标签:0s,ok,安装,gitlab,汉化,linux,node1,root 来源: https://www.cnblogs.com/khstudy/p/16611451.html
本站声明: 1. iCode9 技术分享网(下文简称本站)提供的所有内容,仅供技术学习、探讨和分享; 2. 关于本站的所有留言、评论、转载及引用,纯属内容发起人的个人观点,与本站观点和立场无关; 3. 关于本站的所有言论和文字,纯属内容发起人的个人观点,与本站观点和立场无关; 4. 本站文章均是网友提供,不完全保证技术分享内容的完整性、准确性、时效性、风险性和版权归属;如您发现该文章侵犯了您的权益,可联系我们第一时间进行删除; 5. 本站为非盈利性的个人网站,所有内容不会用来进行牟利,也不会利用任何形式的广告来间接获益,纯粹是为了广大技术爱好者提供技术内容和技术思想的分享性交流网站。