标签:kernel ... gitlab machine 极狐 version docker
1. 环境信息
1.1 主机信息
| 主机 | 用途 |
|---|---|
| 10.10.10.60 | 极狐gitlab |
1.2 配置信息
[root@localhost ~]# cat /etc/centos-release
CentOS Linux release 7.9.2009 (Core)
[root@localhost ~]#
[root@localhost ~]# uname -r
3.10.0-1160.el7.x86_64
[root@localhost ~]#
[root@localhost ~]# free -m
              total        used        free      shared  buff/cache   available
Mem:           8004         208        7482           8         313        7548
Swap:          3967           0        3967
[root@localhost ~]#
[root@localhost ~]# lscpu
Architecture:          x86_64
CPU op-mode(s):        32-bit, 64-bit
Byte Order:            Little Endian
CPU(s):                2
On-line CPU(s) list:   0,1
Thread(s) per core:    1
Core(s) per socket:    2
Socket(s):             1
NUMA node(s):          1
Vendor ID:             GenuineIntel
CPU family:            6
Model:                 141
Model name:            11th Gen Intel(R) Core(TM) i7-11800H @ 2.30GHz
Stepping:              1
CPU MHz:               2304.002
BogoMIPS:              4608.00
Hypervisor vendor:     VMware
Virtualization type:   full
L1d cache:             48K
L1i cache:             32K
L2 cache:              1280K
L3 cache:              24576K
NUMA node0 CPU(s):     0,1
Flags:                 fpu vme de pse tsc msr pae mce cx8 apic sep mtrr pge mca cmov pat pse36 clflush mmx fxsr sse sse2 ss ht syscall nx pdpe1gb rdtscp lm constant_tsc arch_perfmon rep_good nopl xtopology tsc_reliable nonstop_tsc eagerfpu pni pclmulqdq ssse3 fma cx16 pcid sse4_1 sse4_2 x2apic movbe popcnt tsc_deadline_timer aes xsave avx f16c rdrand hypervisor lahf_lm abm 3dnowprefetch invpcid_single ssbd ibrs ibpb stibp ibrs_enhanced fsgsbase tsc_adjust bmi1 avx2 smep bmi2 erms invpcid avx512f avx512dq rdseed adx smap avx512ifma clflushopt clwb avx512cd sha_ni avx512bw avx512vl xsaveopt xsavec xgetbv1 arat avx512vbmi umip pku ospke avx512_vbmi2 gfni vaes vpclmulqdq avx512_vnni avx512_bitalg avx512_vpopcntdq movdiri movdir64b md_clear spec_ctrl intel_stibp flush_l1d arch_capabilities
[root@localhost ~]#
1.3 环境初始化
echo "设置时钟同步"
yum install -y chrony
systemctl start chronyd.service
systemctl enable chronyd.service

echo "关闭防火墙"
systemctl stop firewalld
systemctl disable firewalld

echo "关闭 selinux"
setenforce 0
sed -i 's/SELINUX=enforcing/SELINUX=disabled/g' /etc/selinux/config
getenforce

echo "优化 ssh 登录速度"
sed -i 's/#UseDNS yes/UseDNS no/g' /etc/ssh/sshd_config
systemctl restart sshd

echo "安装基础软件 lrzsz, epel-release"
yum install epel-release lrzsz -y
1.4 升级内核
rpm --import https://www.elrepo.org/RPM-GPG-KEY-elrepo.org
# 安装ELRepo
rpm -Uvh http://www.elrepo.org/elrepo-release-7.0-3.el7.elrepo.noarch.rpm
# 载入elrepo-kernel元数据
yum --disablerepo=\* --enablerepo=elrepo-kernel repolist
# 查看可用的rpm包
yum --disablerepo=\* --enablerepo=elrepo-kernel list kernel*
# 安装长期支持版本的kernel
yum --disablerepo=\* --enablerepo=elrepo-kernel install -y kernel-lt.x86_64
# 删除旧版本工具包
yum remove kernel-tools-libs.x86_64 kernel-tools.x86_64 -y
# 安装新版本工具包
yum --disablerepo=\* --enablerepo=elrepo-kernel install -y kernel-lt-tools.x86_64

#查看默认启动顺序
awk -F\' '$1=="menuentry " {print $2}' /etc/grub2.cfg

#默认启动的顺序是从0开始,新内核是从头插入(目前位置在0,而4.4.4的是在1),所以需要选择0。
grub2-set-default 0

reboot
- 当前最新稳定内核版本
CentOS Linux (5.4.180-1.el7.elrepo.x86_64) 7 (Core)
1.5 安装 docker
参考:Get Docker | Docker Documentation 或者
echo "
net.ipv4.ip_forward = 1
net.bridge.bridge-nf-call-ip6tables = 1
net.bridge.bridge-nf-call-iptables = 1" >> /etc/sysctl.conf
sysctl -p

curl https://releases.rancher.com/install-docker/19.03.sh | sh
systemctl enable docker
设置国内源
vi /etc/docker/daemon.json
{
    "registry-mirrors": ["https://hccwwfjl.mirror.aliyuncs.com"]
}

systemctl restart docker
- 其他源:http://hub-mirror.c.163.com,建议用这个 163 的
1.6 安装 docker machine
参考:Testing Environment | GitLab
$ curl -L https://github.com/docker/machine/releases/download/v0.16.2/docker-machine-`uname -s`-`uname -m` >/usr/local/bin/docker-machine && \
  chmod +x /usr/local/bin/docker-machine

$ docker-machine version
docker-machine version 0.16.2, build bd45ab13
2. 安装极狐gitlab
参考官方文档:Testing Environment | GitLab
2.1 获取可用的极狐gitlab镜像tags
$ curl https://version.gitlab.cn/api/v1/versions
[{"id":138,"version":"15.1.2","major":15,"minor":1,"created_at":"2022-07-18T08:56:08.077+08:00"},{"id":137,"version":"15.1.1","major":15,"minor":1,"created_at":"2022-07-04T21:40:13.500+08:00"},{"id":136,"version":"15.0.4","major":15,"minor":0,"created_at":"2022-07-04T20:49:12.275+08:00"},{"id":135,"version":"14.10.5","major":14,"minor":10,"created_at":"2022-07-04T20:48:53.544+08:00"},{"id":134,"version":"15.1.0","major":15,"minor":1,"created_at":"2022-06-29T08:48:24.417+08:00"},{"id":133,"version":"15.0.3","major":15,"minor":0,"created_at":"2022-06-21T11:34:56.890+08:00"},{"id":132,"version":"14.10.4","major":14,"minor":10,"created_at":"2022-06-09T00:38:44.427+08:00"},{"id":131,"version":"15.0.2","major":15,"minor":0,"created_at":"2022-06-09T00:38:35.091+08:00"},{"id":130,"version":"14.9.5","major":14,"minor":9,"created_at":"2022-06-09T00:38:25.486+08:00"},{"id":129,"version":"14.10.3","major":14,"minor":10,"created_at":"2022-06-09T00:38:20.119+08:00"},{"id":128,"version":"15.0.1","major":15,"minor":0,"created_at":"2022-06-09T00:37:57.686+08:00"},{"id":127,"version":"15.0.0","major":15,"minor":0,"created_at":"2022-05-30T14:47:01.074+08:00"},{"id":126,"version":"14.9.4","major":14,"minor":9,"created_at":"2022-05-16T10:20:15.342+08:00"},{"id":125,"version":"14.10.2","major":14,"minor":10,"created_at":"2022-05-16T10:20:05.693+08:00"},{"id":124,"version":"14.8.6","major":14,"minor":8,"created_at":"2022-05-11T09:38:30.199+08:00"},{"id":123,"version":"14.10.1","major":14,"minor":10,"created_at":"2022-05-11T09:38:25.259+08:00"},{"id":122,"version":"14.10.0","major":14,"minor":10,"created_at":"2022-04-28T10:55:42.550+08:00"},{"id":121,"version":"14.9.3","major":14,"minor":9,"created_at":"2022-04-15T15:27:32.220+08:00"},{"id":120,"version":"14.7.7","major":14,"minor":7,"created_at":"2022-04-07T23:33:06.372+08:00"},{"id":119,"version":"14.8.5","major":14,"minor":8,"created_at":"2022-04-07T20:10:25.222+08:00"},{"id":118,"version":"14.9.2","major":14,"minor":9,"created_at":"2022-04-07T18:05:01.894+08:00"},{"id":117,"version":"14.7.6","major":14,"minor":7,"created_at":"2022-04-01T11:05:38.177+08:00"},{"id":116,"version":"14.9.1","major":14,"minor":9,"created_at":"2022-03-30T15:02:25.234+08:00"},{"id":115,"version":"14.7.5","major":14,"minor":7,"created_at":"2022-03-30T07:06:00.278+08:00"},{"id":114,"version":"14.9.0","major":14,"minor":9,"created_at":"2022-03-28T15:14:45.356+08:00"}]
2.2 设置环境变量
export SSH_PORT=2222
export HTTP_PORT=8888
export VERSION=15.1.2
export ENV_NAME=gitlab-test-env
export CONTAINER_NAME=gitlab-test-14.7.3
2.3 创建 docker host
docker-machine create \
--virtualbox-cpu-count -1 \
--virtualbox-memory 4096 \
--virtualbox-disk-size 30000 \
--driver virtualbox $ENV_NAME
会出现以下报错
Creating CA: /root/.docker/machine/certs/ca.pem
Creating client certificate: /root/.docker/machine/certs/cert.pem
Running pre-create checks...
Error with pre-create check: "VBoxManage not found. Make sure VirtualBox is installed and VBoxManage is in the path"
原因是未安装 VirtualBox,解决方法如下
Linux_Downloads – Oracle VM VirtualBox
wget https://download.virtualbox.org/virtualbox/6.1.32/VirtualBox-6.1-6.1.32_149290_el7-1.x86_64.rpm
yum install -y VirtualBox-6.1-6.1.32_149290_el7-1.x86_64.rpm
- 必须使用 yum 安装 rpm 包,以便解决依赖
再次运行 docker-machine 创建命令,出现以下报错:
Running pre-create checks...
Error with pre-create check: "We support Virtualbox starting with version 5. Your VirtualBox install is \"WARNING: The vboxdrv kernel module is not loaded. Either there is no module\\n         available for the current kernel (5.4.180-1.el7.elrepo.x86_64) or it failed to\\n         load. Please recompile the kernel module and install it by\\n\\n           sudo /sbin/vboxconfig\\n\\n         You will not be able to start VMs until this problem is fixed.\\n6.1.32r149290\". Please upgrade at https://www.virtualbox.org"
按照提示执行命令 /sbin/vboxconfig
$ /sbin/vboxconfig
vboxdrv.sh: Stopping VirtualBox services.
vboxdrv.sh: Starting VirtualBox services.
vboxdrv.sh: Building VirtualBox kernel modules.
This system is currently not set up to build kernel modules.
Please install the gcc make perl packages from your distribution.
Please install the Linux kernel "header" files matching the current kernel
for adding new hardware support to the system.
The distribution packages containing the headers are probably:
    kernel-devel kernel-devel-5.4.180-1.el7.elrepo.x86_64

There were problems setting up VirtualBox.  To re-start the set-up process, run
  /sbin/vboxconfig
as root.  If your system is using EFI Secure Boot you may need to sign the
kernel modules (vboxdrv, vboxnetflt, vboxnetadp, vboxpci) before you can load
them. Please see your Linux system's documentation for more information.
根据提示执行
yum install -y gcc make perl

# 会提示找不到 kernel-devel-5.4.180-1.el7.elrepo.x86_64
yum install -y kernel-devel kernel-devel-5.4.180-1.el7.elrepo.x86_64
原因是前面我们升级了内核到 5.4,内核太新了,重新使用默认 3.10 内核
#查看默认启动顺序
$ awk -F\' '$1=="menuentry " {print $2}' /etc/grub2.cfg
CentOS Linux (5.4.180-1.el7.elrepo.x86_64) 7 (Core)
CentOS Linux (3.10.0-1160.el7.x86_64) 7 (Core)
CentOS Linux (0-rescue-5fe30f5d6bc041278a5ab7b332967cb0) 7 (Core)

#默认启动的顺序是从0开始,所以需要选择1。
grub2-set-default 1

reboot
重启后执行 /sbin/vboxconfig
$ uname -r
3.10.0-1160.el7.x86_64

$ /sbin/vboxconfig
vboxdrv.sh: Stopping VirtualBox services.
vboxdrv.sh: Starting VirtualBox services.
vboxdrv.sh: Building VirtualBox kernel modules.
This system is currently not set up to build kernel modules.
Please install the Linux kernel "header" files matching the current kernel
for adding new hardware support to the system.
The distribution packages containing the headers are probably:
    kernel-devel kernel-devel-3.10.0-1160.el7.x86_64
This system is currently not set up to build kernel modules.
Please install the Linux kernel "header" files matching the current kernel
for adding new hardware support to the system.
The distribution packages containing the headers are probably:
    kernel-devel kernel-devel-3.10.0-1160.el7.x86_64

There were problems setting up VirtualBox.  To re-start the set-up process, run
  /sbin/vboxconfig
as root.  If your system is using EFI Secure Boot you may need to sign the
kernel modules (vboxdrv, vboxnetflt, vboxnetadp, vboxpci) before you can load
them. Please see your Linux system's documentation for more information.
根据提示执行
yum install -y kernel-devel kernel-devel-3.10.0-1160.el7.x86_64
再执行 /sbin/vboxconfig
$ /sbin/vboxconfig
vboxdrv.sh: Stopping VirtualBox services.
vboxdrv.sh: Starting VirtualBox services.
vboxdrv.sh: Building VirtualBox kernel modules.
- 成功编译进内核
再次执行 docker-machine,还是报错:
Running pre-create checks...
Error with pre-create check: "This computer doesn't have VT-X/AMD-v enabled. Enabling it in the BIOS is mandatory"
原因是 vm 未开启硬件虚拟化,关闭虚拟机,开启即可
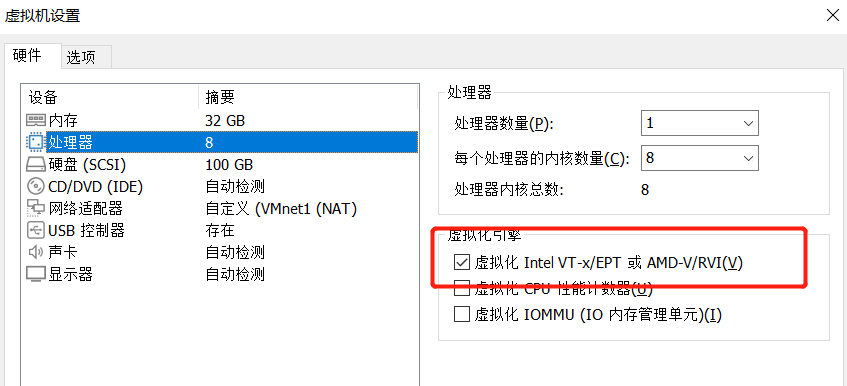
- 勾选
虚拟化 Intel VT-X/EPT 或 AMD-V/RVI(V)
重启后再次运行 docker-machine,结果因为网络原因下载镜像失败
Running pre-create checks...
(gitlab-test-env) No default Boot2Docker ISO found locally, downloading the latest release...
(gitlab-test-env) Latest release for github.com/boot2docker/boot2docker is v19.03.12
(gitlab-test-env) Downloading /root/.docker/machine/cache/boot2docker.iso from https://github.com/boot2docker/boot2docker/releases/download/v19.03.12/boot2docker.iso...
Error with pre-create check: "Get https://github.com/boot2docker/boot2docker/releases/download/v19.03.12/boot2docker.iso: read tcp 10.10.10.60:38606->20.205.243.166:443: read: connection reset by peer"
解决方法很简单,先在合适网络下下载 https://github.com/boot2docker/boot2docker/releases/download/v19.03.12/boot2docker.iso,然后把 boot2docker.iso 放到目录 /root/.docker/machine/cache/ 下即可
再次运行 docker-machine
$ docker-machine create \
> --virtualbox-cpu-count -1 \
> --virtualbox-memory 4096 \
> --virtualbox-disk-size 30000 \
> --driver virtualbox $ENV_NAME
Running pre-create checks...
Creating machine...
(gitlab-test-env) Copying /root/.docker/machine/cache/boot2docker.iso to /root/.docker/machine/machines/gitlab-test-env/boot2docker.iso...
(gitlab-test-env) Creating VirtualBox VM...
(gitlab-test-env) Creating SSH key...
(gitlab-test-env) Starting the VM...
(gitlab-test-env) Check network to re-create if needed...
(gitlab-test-env) Found a new host-only adapter: "vboxnet0"
Error creating machine: Error in driver during machine creation: Error setting up host only network on machine start: /usr/bin/VBoxManage hostonlyif ipconfig vboxnet0 --ip 192.168.99.1 --netmask 255.255.255.0 failed:
VBoxManage: error: Code E_ACCESSDENIED (0x80070005) - Access denied (extended info not available)
VBoxManage: error: Context: "EnableStaticIPConfig(Bstr(pszIp).raw(), Bstr(pszNetmask).raw())" at line 242 of file VBoxManageHostonly.cpp
解决方法如下:
1. docker-machine ls 的所有计算机
2. 用 docker-machine rm -y <machineName> 删除它们
3. 用 VBoxManage list hostonlyifs 查找所有 host-only 以太网适配器
4. 用 VBoxManage hostonlyif remove <networkName> 逐个删除它们
5. 创建 /etc/vbox 文件夹
6. 写入文件 echo "* 0.0.0.0/0 ::/0" > /etc/vbox/networks.conf
- 这种解决方法可能会导致启动 docker 机器时
Waiting for an IP...会花费多一点时间
再次创建 host,正常运行了
$ docker-machine create \
> --virtualbox-cpu-count -1 \
> --virtualbox-memory 4096 \
> --virtualbox-disk-size 30000 \
> --driver virtualbox $ENV_NAME
Running pre-create checks...
Creating machine...
(gitlab-test-env) Copying /root/.docker/machine/cache/boot2docker.iso to /root/.docker/machine/machines/gitlab-test-env/boot2docker.iso...
(gitlab-test-env) Creating VirtualBox VM...
(gitlab-test-env) Creating SSH key...
(gitlab-test-env) Starting the VM...
(gitlab-test-env) Check network to re-create if needed...
(gitlab-test-env) Found a new host-only adapter: "vboxnet0"
(gitlab-test-env) Waiting for an IP...
Waiting for machine to be running, this may take a few minutes...
Detecting operating system of created instance...
Waiting for SSH to be available...
Detecting the provisioner...
Provisioning with boot2docker...
Copying certs to the local machine directory...
Copying certs to the remote machine...
Setting Docker configuration on the remote daemon...
Checking connection to Docker...
Docker is up and running!
To see how to connect your Docker Client to the Docker Engine running on this virtual machine, run: docker-machine env gitlab-test-env

$ docker-machine ls
NAME              ACTIVE   DRIVER       STATE     URL                         SWARM   DOCKER      ERRORS
gitlab-test-env   -        virtualbox   Running   tcp://192.168.99.100:2376           v19.03.12
2.4 连接到 docker host
eval "$(docker-machine env ${ENV_NAME})"
如果需要长期使用可以添加到配置文件:echo 'eval "$(docker-machine env gitlab-test-env)"' >> ~/.bash_profile
查看是否生效
docker info
Client:
 Debug Mode: false

Server:
 Containers: 0
  Running: 0
  Paused: 0
  Stopped: 0
 Images: 0
 Server Version: 19.03.12
 Storage Driver: overlay2
  Backing Filesystem: extfs
  Supports d_type: true
  Native Overlay Diff: true
 Logging Driver: json-file
 Cgroup Driver: cgroupfs
 Plugins:
  Volume: local
  Network: bridge host ipvlan macvlan null overlay
  Log: awslogs fluentd gcplogs gelf journald json-file local logentries splunk syslog
 Swarm: inactive
 Runtimes: runc
 Default Runtime: runc
 Init Binary: docker-init
 containerd version: 7ad184331fa3e55e52b890ea95e65ba581ae3429
 runc version: dc9208a3303feef5b3839f4323d9beb36df0a9dd
 init version: fec3683
 Security Options:
  seccomp
   Profile: default
 Kernel Version: 4.19.130-boot2docker
 Operating System: Boot2Docker 19.03.12 (TCL 10.1)
 OSType: linux
 Architecture: x86_64
 CPUs: 2
 Total Memory: 3.852GiB
 Name: gitlab-test-env
 ID: AFYU:KGWR:RTE4:FG6E:ZYSC:2TUX:CYRC:3RJW:KDUE:OPZM:KJL2:LMDR
 Docker Root Dir: /mnt/sda1/var/lib/docker
 Debug Mode: false
 Registry: https://index.docker.io/v1/
 Labels:
  provider=virtualbox
 Experimental: false
 Insecure Registries:
  127.0.0.0/8
 Live Restore Enabled: false
 Product License: Community Engine
- 可以看到 Name 是 gitlab-test-env,证明已生效
2.5 创建极狐gitlab容器
export IP=$(docker-machine ip $ENV_NAME)

docker run -d \
--env GITLAB_OMNIBUS_CONFIG="external_url 'http://$IP:$HTTP_PORT'; gitlab_rails['gitlab_shell_ssh_port'] = $SSH_PORT;" \
--hostname $IP \
-p $HTTP_PORT:$HTTP_PORT -p $SSH_PORT:22 \
--name $CONTAINER_NAME \
registry.gitlab.cn/omnibus/gitlab-jh:$VERSION

$ docker ps
CONTAINER ID        IMAGE                          COMMAND             CREATED             STATUS                                 PORTS                                                           NAMES
87d83d00755d        gitlab/gitlab-ee:14.7.3-ee.0   "/assets/wrapper"   3 minutes ago       Up About a minute (health: starting)   80/tcp, 443/tcp, 0.0.0.0:8888->8888/tcp, 0.0.0.0:2222->22/tcp   gitlab-test-14.7.3
2.6 访问极狐gitlab
首先获取 docker host 虚拟机 ip
$ echo $IP
192.168.99.100

# 获取 root 账号初始密码
docker exec ${CONTAINER_NAME} cat /etc/gitlab/initial_root_password
访问 http://192.168.99.100:8888 即可看到极狐gitlab页面
标签:kernel,...,gitlab,machine,极狐,version,docker 来源: https://www.cnblogs.com/leffss/p/16492865.html
本站声明: 1. iCode9 技术分享网(下文简称本站)提供的所有内容,仅供技术学习、探讨和分享; 2. 关于本站的所有留言、评论、转载及引用,纯属内容发起人的个人观点,与本站观点和立场无关; 3. 关于本站的所有言论和文字,纯属内容发起人的个人观点,与本站观点和立场无关; 4. 本站文章均是网友提供,不完全保证技术分享内容的完整性、准确性、时效性、风险性和版权归属;如您发现该文章侵犯了您的权益,可联系我们第一时间进行删除; 5. 本站为非盈利性的个人网站,所有内容不会用来进行牟利,也不会利用任何形式的广告来间接获益,纯粹是为了广大技术爱好者提供技术内容和技术思想的分享性交流网站。