标签:10.0 00 IOMMU kvm lft my your
1 install software
apt -y install qemu-kvm libvirt-daemon-system libvirt-daemon virtinst bridge-utils libosinfo-bin
apt -y install virt-manager qemu-system
apt -y install ovmf
2 enable iommu
2.1Config BIOS
- Intel Based: Enable "Intel VT-d". May also be called "Intel Virtualization Technology" or simply "VT-d" on some motherboards.
- AMD Based: Enable "SVM". May also be called "AMD Virtualization" or simply "AMD-V".
- Note: I've seen "IOMMU" as it's own separate option on one of my motherboards, but not on any of my other motherboards. Make sure it's enabled if you do see it. If you don't see it, it's likely rolled into one of the former VT-d or AMD-V options listed above.
2.2Checking for IOMMU Support on your CPU
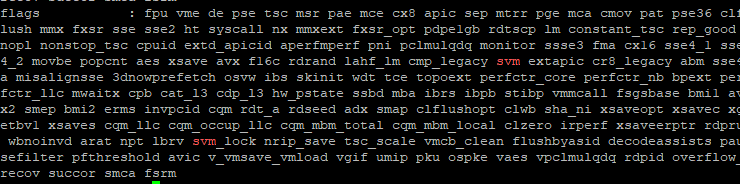
On Debian for my AMD processor, it's as easy as this:
cat /proc/cpuinfo | grep --color svm
You can see it highlighted below:
The Intel equivalent is this:
cat /proc/cpuinfo | grep --color vmx
2.3Enabling IOMMU in Linux
NOTE: Before you do the following, it's helpful to go back in your BIOS and make sure that the Primary GPU is set to integrated and not using your passthrough graphics card. This is called "Boot GPU" and "Primary Graphics" in my BIOS.
Add the following options to your GRUB_CMDLINE_LINUX or GRUB_CMDLINE_LINUX_DEFAULT
option in the /etc/default/grub file。
AMD:
GRUB_CMDLINE_LINUX_DEFAULT="quiet amd_iommu=on iommu=pt pcie_acs_override=downstream,multifunction video=vesafb:off video=efifb:off"
amd_iommu=on iommu=pt video=efifb:off pcie_acs_override=downstream,multifunction video=vesafb:off
For me, it will look like this. If there's options in there already, leave them alone.
Intel:
intel_iommu=on iommu=pt video=efifb:off pcie_acs_override=downstream video=vesafb:off
And then update GRUB:
sudo grub-mkconfig -o /boot/grub/grub.cfg
to rebuild your Grub config.
If your computer boots without error Before we celebrate, let's make sure IOMMU is really enabled dmesg | grep -i -e DMAR -e IOMMU do you see the line Intel-IOMMU: enabled or something along those lines for amd? Hopefully, if not, make sure your cpu supports IOMMU and you correctly followed the prevoius steps
2.4Finding IOMMU Groups
Before looking at the IOMMU Groups, I want to make sure that my graphics card is visible to the OS. I run the following command:
lspci -nnk | grep VGA
For me, this results in 3 graphics controllers being shown: The ASPEED one that's part of my motherboard, the NVIDIA one that's my T400 graphics card, and the AMD one which is the Vega graphics that's part of my CPU. Of course, you'll likely see different.

To list all the IOMMU groups they are part of, we'll use the following script that someone else wrote:
#!/bin/bash
shopt -s nullglob
for g in /sys/kernel/iommu_groups/*; do
    echo "IOMMU Group ${g##*/}:"
    for d in $g/devices/*; do
        echo -e "\t$(lspci -nns ${d##*/})"
    done;
done;
Take note of the IOMMU Group your graphics card is in. Note that mine is in IOMMU Group 7:

The Vega graphics that are integrated with my CPU are in IOMMU Group 4:

The group containg your gpu (the one you want to use in your VM) should only contain the VGA controller, and audio device. If you have more than that, refer to https://wiki.archlinux.org/index.php/PCI_passthrough_via_OVMF#Bypassing_the_IOMMU_groups_(ACS_override_patch) Though that will not be covered in this guide
The whole group should be captured by totally,not partly.
Congratulations! You have successfully enabled IOMMU and your groups are valid, time to move on
3 isolate gpu with vfio
4 Configure Bridge networking for KVM virtual machines.
ip addr
1: lo: <LOOPBACK,UP,LOWER_UP> mtu 65536 qdisc noqueue state UNKNOWN group default qlen 1000
    link/loopback 00:00:00:00:00:00 brd 00:00:00:00:00:00
    inet 127.0.0.1/8 scope host lo
       valid_lft forever preferred_lft forever
    inet6 ::1/128 scope host
       valid_lft forever preferred_lft forever
2: enp1s0: <BROADCAST,MULTICAST,UP,LOWER_UP> mtu 1500 qdisc pfifo_fast state UP group default qlen 1000
    link/ether 52:54:00:0c:48:f6 brd ff:ff:ff:ff:ff:ff
    inet 10.0.0.30/24 brd 10.0.0.255 scope global enp1s0
       valid_lft forever preferred_lft forever
    inet6 fe80::5054:ff:fe0c:48f6/64 scope link
       valid_lft forever preferred_lft forever
把原来的网卡都注释掉,改成如下的
vim /etc/network/interfaces
# This file describes the network interfaces available on your system
# and how to activate them. For more information, see interfaces(5).

source /etc/network/interfaces.d/*

# The loopback network interface
auto lo
iface lo inet loopback

# The primary network interface
allow-hotplug enp1s0
# change existing setting like follows
iface enp1s0 inet manual
#address 10.0.0.30
#network 10.0.0.0
#netmask 255.255.255.0
#broadcast 10.0.0.255
#gateway 10.0.0.1
#dns-nameservers 10.0.0.10

# add bridge interface setting
# for [hwaddress] line, specify the same MAC address with physical one ([enp1s0] on this example)
# set this param explicitly if different MAC address is assigned to bridge ingterface
auto br0
iface br0 inet static
address 10.0.0.30
network 10.0.0.0
netmask 255.255.255.0
broadcast 10.0.0.255
gateway 10.0.0.1
dns-nameservers 10.0.0.10
bridge_ports enp1s0
bridge_stp off
hwaddress ether 52:54:00:0c:48:f6
标签:10.0,00,IOMMU,kvm,lft,my,your 来源: https://www.cnblogs.com/zhangjunrui/p/16340201.html
本站声明: 1. iCode9 技术分享网(下文简称本站)提供的所有内容,仅供技术学习、探讨和分享; 2. 关于本站的所有留言、评论、转载及引用,纯属内容发起人的个人观点,与本站观点和立场无关; 3. 关于本站的所有言论和文字,纯属内容发起人的个人观点,与本站观点和立场无关; 4. 本站文章均是网友提供,不完全保证技术分享内容的完整性、准确性、时效性、风险性和版权归属;如您发现该文章侵犯了您的权益,可联系我们第一时间进行删除; 5. 本站为非盈利性的个人网站,所有内容不会用来进行牟利,也不会利用任何形式的广告来间接获益,纯粹是为了广大技术爱好者提供技术内容和技术思想的分享性交流网站。