标签:Netty 00 index buffer 写入 内存 ByteBuf
ByteBuf的创建
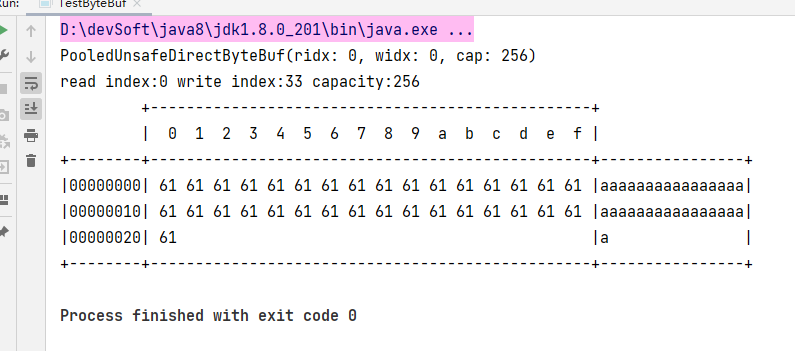
通过ByteBufAllocator.DEFAULT.buffer()进行创建ByteBuf
        ByteBuf buffer = ByteBufAllocator.DEFAULT.buffer();
        System.out.println(buffer);
        StringBuilder sb = new StringBuilder();
        for (int i = 0; i < 33; i++) {
            sb.append("a");
        }
        buffer.writeBytes(sb.toString().getBytes());
        Log.log(buffer);
Log类:
public abstract class Log {
    public static void log(ByteBuf buffer) {
        int length = buffer.readableBytes();
        int rows = length / 16 + (length % 15 == 0 ? 0 : 1) + 4;
        StringBuilder buf = new StringBuilder(rows * 80 * 2)
                .append("read index:").append(buffer.readerIndex())
                .append(" write index:").append(buffer.writerIndex())
                .append(" capacity:").append(buffer.capacity())
                .append(NEWLINE);
        appendPrettyHexDump(buf, buffer);
        System.out.println(buf.toString());
    }
}
内存模式
直接内存 vs 堆内存
可以使用下面的代码来创建池化基于堆的 ByteBuf
ByteBuf buffer = ByteBufAllocator.DEFAULT.heapBuffer(10);
也可以使用下面的代码来创建池化基于直接内存的 ByteBuf
ByteBuf buffer = ByteBufAllocator.DEFAULT.directBuffer(10);
- 直接内存创建和销毁的代价昂贵,但读写性能高(少一次内存复制),适合配合池化功能一起用
- 直接内存对 GC 压力小,因为这部分内存不受 JVM 垃圾回收的管理,但也要注意及时主动释放
池化
池化 vs 非池化
池化的最大意义在于可以重用 ByteBuf,优点有
- 没有池化,则每次都得创建新的 ByteBuf 实例,这个操作对直接内存代价昂贵,就算是堆内存,也会增加 GC 压力
- 有了池化,则可以重用池中 ByteBuf 实例,并且采用了与 jemalloc 类似的内存分配算法提升分配效率
- 高并发时,池化功能更节约内存,减少内存溢出的可能
池化功能是否开启,可以通过下面的系统环境变量来设置
-Dio.netty.allocator.type={unpooled|pooled}
- 4.1 以后,非 Android 平台默认启用池化实现,Android 平台启用非池化实现
- 4.1 之前,池化功能还不成熟,默认是非池化实现
源代码在:ByteBufUtil类

组成
ByteBuf 由四部分组成
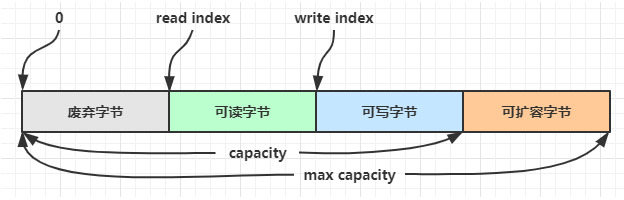
最开始读写指针都在 0 位置
写入
方法列表,省略一些不重要的方法
| 方法签名 | 含义 | 备注 |
|---|---|---|
| writeBoolean(boolean value) | 写入 boolean 值 | 用一字节 01|00 代表 true|false |
| writeByte(int value) | 写入 byte 值 | |
| writeShort(int value) | 写入 short 值 | |
| writeInt(int value) | 写入 int 值 | Big Endian,即 0x250,写入后 00 00 02 50(先写高位) |
| writeIntLE(int value) | 写入 int 值 | Little Endian,即 0x250,写入后 50 02 00 00(先写低位) |
| writeLong(long value) | 写入 long 值 | |
| writeChar(int value) | 写入 char 值 | |
| writeFloat(float value) | 写入 float 值 | |
| writeDouble(double value) | 写入 double 值 | |
| writeBytes(ByteBuf src) | 写入 netty 的 ByteBuf | |
| writeBytes(byte[] src) | 写入 byte[] | |
| writeBytes(ByteBuffer src) | 写入 nio 的 ByteBuffer | |
| int writeCharSequence(CharSequence sequence, Charset charset) |
注意
- 这些方法的未指明返回值的,其返回值都是 ByteBuf,意味着可以链式调用
- 网络传输,默认习惯是 Big Endian
先写入 4 个字节
buffer.writeBytes(new byte[]{1, 2, 3, 4});
log(buffer);
结果是
read index:0 write index:4 capacity:10
         +-------------------------------------------------+
         |  0  1  2  3  4  5  6  7  8  9  a  b  c  d  e  f |
+--------+-------------------------------------------------+----------------+
|00000000| 01 02 03 04                                     |....            |
+--------+-------------------------------------------------+----------------+
再写入一个 int 整数,也是 4 个字节
buffer.writeInt(5);
log(buffer);
结果是
read index:0 write index:8 capacity:10
         +-------------------------------------------------+
         |  0  1  2  3  4  5  6  7  8  9  a  b  c  d  e  f |
+--------+-------------------------------------------------+----------------+
|00000000| 01 02 03 04 00 00 00 05                         |........        |
+--------+-------------------------------------------------+----------------+
还有一类方法是 set 开头的一系列方法,也可以写入数据,但不会改变写指针位置
扩容:
再写入一个 int 整数时,容量不够了(初始容量是 10),这时会引发扩容
buffer.writeInt(6);
log(buffer);
扩容规则是
- 如何写入后数据大小未超过 512,则选择下一个 16 的整数倍,例如写入后大小为 12 ,则扩容后 capacity 是 16
- 如果写入后数据大小超过 512,则选择下一个 2^n,例如写入后大小为 513,则扩容后 capacity 是 210=1024(29=512 已经不够了)
- 扩容不能超过 max capacity 会报错
结果是
read index:0 write index:12 capacity:16
         +-------------------------------------------------+
         |  0  1  2  3  4  5  6  7  8  9  a  b  c  d  e  f |
+--------+-------------------------------------------------+----------------+
|00000000| 01 02 03 04 00 00 00 05 00 00 00 06             |............    |
+--------+-------------------------------------------------+----------------+
读取
例如读了 4 次,每次一个字节
System.out.println(buffer.readByte());
System.out.println(buffer.readByte());
System.out.println(buffer.readByte());
System.out.println(buffer.readByte());
log(buffer);
读过的内容,就属于废弃部分了,再读只能读那些尚未读取的部分
1
2
3
4
read index:4 write index:12 capacity:16
         +-------------------------------------------------+
         |  0  1  2  3  4  5  6  7  8  9  a  b  c  d  e  f |
+--------+-------------------------------------------------+----------------+
|00000000| 00 00 00 05 00 00 00 06                         |........        |
+--------+-------------------------------------------------+----------------+
如果需要重复读取 int 整数 5,怎么办?
可以在 read 前先做个标记 mark
buffer.markReaderIndex();
System.out.println(buffer.readInt());
log(buffer);
结果
5
read index:8 write index:12 capacity:16
         +-------------------------------------------------+
         |  0  1  2  3  4  5  6  7  8  9  a  b  c  d  e  f |
+--------+-------------------------------------------------+----------------+
|00000000| 00 00 00 06                                     |....            |
+--------+-------------------------------------------------+----------------+
这时要重复读取的话,重置到标记位置 reset
buffer.resetReaderIndex();
log(buffer);
这时
read index:4 write index:12 capacity:16
         +-------------------------------------------------+
         |  0  1  2  3  4  5  6  7  8  9  a  b  c  d  e  f |
+--------+-------------------------------------------------+----------------+
|00000000| 00 00 00 05 00 00 00 06                         |........        |
+--------+-------------------------------------------------+----------------+
还有种办法是采用 get 开头的一系列方法,这些方法不会改变 read index
retain & release
由于 Netty 中有堆外内存的 ByteBuf 实现,堆外内存最好是手动来释放,而不是等 GC 垃圾回收。
- UnpooledHeapByteBuf 使用的是 JVM 内存,只需等 GC 回收内存即可
- UnpooledDirectByteBuf 使用的就是直接内存了,需要特殊的方法来回收内存
- PooledByteBuf 和它的子类使用了池化机制,需要更复杂的规则来回收内存
回收内存的源码实现,请关注下面方法的不同实现
protected abstract void deallocate()
Netty 这里采用了引用计数法来控制回收内存,每个 ByteBuf 都实现了 ReferenceCounted 接口
- 每个 ByteBuf 对象的初始计数为 1
- 调用 release 方法计数减 1,如果计数为 0,ByteBuf 内存被回收
- 调用 retain 方法计数加 1,表示调用者没用完之前,其它 handler 即使调用了 release 也不会造成回收
- 当计数为 0 时,底层内存会被回收,这时即使 ByteBuf 对象还在,其各个方法均无法正常使用
那么,谁来负责 release 呢?
因为 pipeline 的存在,一般需要将 ByteBuf 传递给下一个 ChannelHandler,如果在 finally 中 release 了,就失去了传递性(当然,如果在这个 ChannelHandler 内这个 ByteBuf 已完成了它的使命,那么便无须再传递)
基本规则是,谁是最后使用者,谁负责 release,详细分析如下:
- 起点,对于 NIO 实现来讲,在 io.netty.channel.nio.AbstractNioByteChannel.NioByteUnsafe#read 方法中首次创建 ByteBuf 放入 pipeline(line 163 pipeline.fireChannelRead(byteBuf))
- 入站 ByteBuf 处理原则
- 对原始 ByteBuf 不做处理,调用 ctx.fireChannelRead(msg) 向后传递,这时无须 release
- 将原始 ByteBuf 转换为其它类型的 Java 对象,这时 ByteBuf 就没用了,必须 release
- 如果不调用 ctx.fireChannelRead(msg) 向后传递,那么也必须 release
- 注意各种异常,如果 ByteBuf 没有成功传递到下一个 ChannelHandler,必须 release
- 假设消息一直向后传,那么 TailContext 会负责释放未处理消息(原始的 ByteBuf)
- 出站 ByteBuf 处理原则
- 出站消息最终都会转为 ByteBuf 输出,一直向前传,由 HeadContext flush 后 release
- 异常处理原则
- 有时候不清楚 ByteBuf 被引用了多少次,但又必须彻底释放,可以循环调用 release 直到返回 true
TailContext 释放未处理消息逻辑
// io.netty.channel.DefaultChannelPipeline#onUnhandledInboundMessage(java.lang.Object)
protected void onUnhandledInboundMessage(Object msg) {
    try {
        logger.debug(
            "Discarded inbound message {} that reached at the tail of the pipeline. " +
            "Please check your pipeline configuration.", msg);
    } finally {
        ReferenceCountUtil.release(msg);
    }
}
具体代码
// io.netty.util.ReferenceCountUtil#release(java.lang.Object)
public static boolean release(Object msg) {
    if (msg instanceof ReferenceCounted) {
        return ((ReferenceCounted) msg).release();
    }
    return false;
}
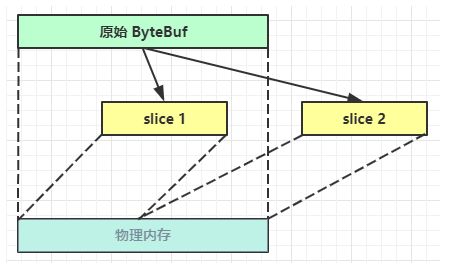
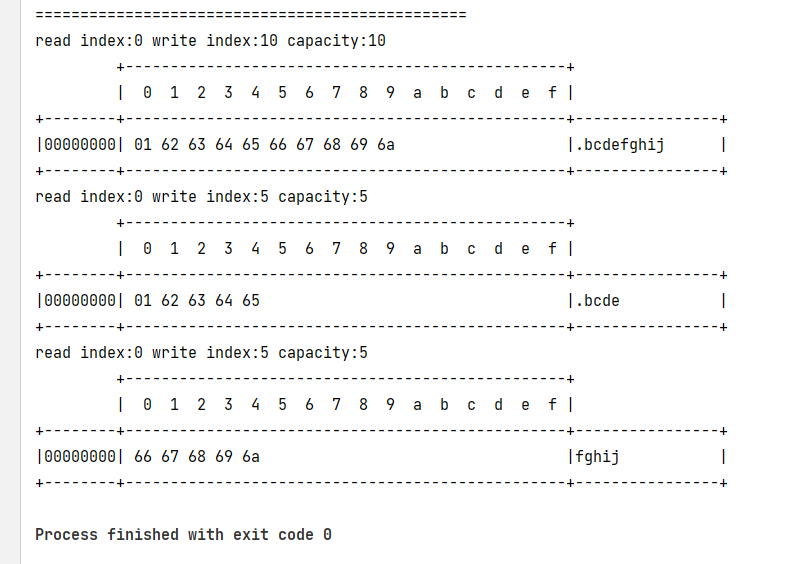
slice(切片)
【零拷贝】的体现之一,对原始 ByteBuf 进行切片成多个 ByteBuf,切片后的 ByteBuf 并没有发生内存复制,还是使用原始 ByteBuf 的内存,切片后的 ByteBuf 维护独立的 read,write 指针
示例:
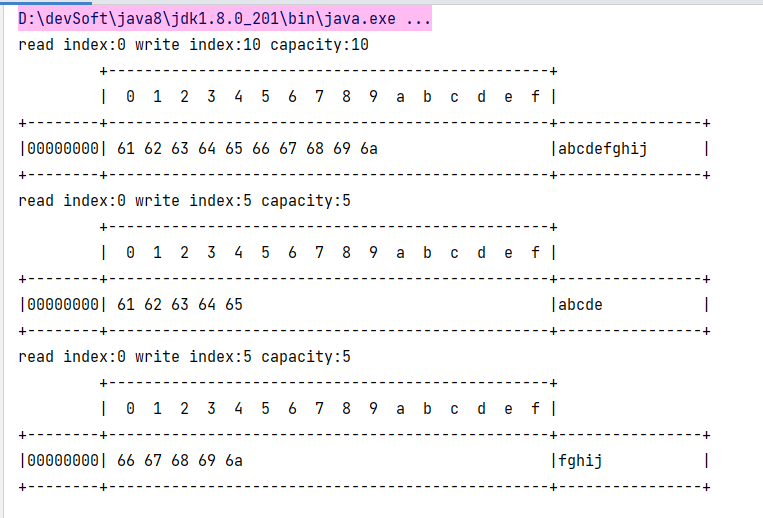
        ByteBuf byteBuf = ByteBufAllocator.DEFAULT.buffer(10);
        byteBuf.writeBytes(new byte[]{'a', 'b', 'c', 'd', 'e', 'f', 'g', 'h', 'i', 'j'});
        Log.log(byteBuf);

        //切片过程中,没有发生数据复制
        //从索引0开始切割,长度为5
        ByteBuf bf1 = byteBuf.slice(0, 5);
        ByteBuf bf2 = byteBuf.slice(5, 5);

        Log.log(bf1);
        Log.log(bf2);
那么如何证明切片使用的还是原始 ByteBuf 的内存?
增加如下代码片段:
        byteBuf.setByte(0, 1);
        System.out.println("================================================");
        Log.log(byteBuf);
        Log.log(bf1);
        Log.log(bf2);
duplicate和copy
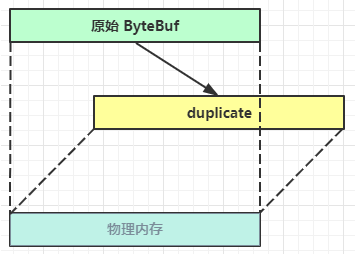
duplicate
【零拷贝】的体现之一,就好比截取了原始 ByteBuf 所有内容,并且没有 max capacity 的限制,也是与原始 ByteBuf 使用同一块底层内存,只是读写指针是独立的.
copy
会将底层内存数据进行深拷贝,因此无论读写,都与原始 ByteBuf 无关
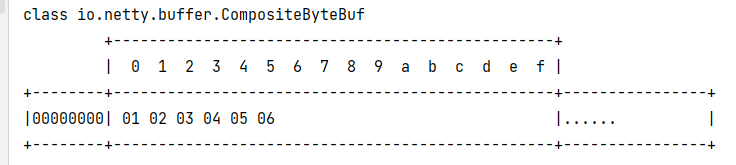
CompositeByteBuf
【零拷贝】的体现之一,可以将多个 ByteBuf 合并为一个逻辑上的 ByteBuf,避免拷贝
有两个 ByteBuf 如下:
        ByteBuf buf1 = ByteBufAllocator.DEFAULT.buffer(5);
        buf1.writeBytes(new byte[]{1, 2, 3, 4, 5});

        ByteBuf buf2 = ByteBufAllocator.DEFAULT.buffer(5);
        buf2.writeBytes(new byte[]{6, 7, 8, 9, 10});
现在需要一个新的 ByteBuf,内容来自于刚才的 buf1 和 buf2,如何实现?
代码如下:
        CompositeByteBuf compositeByteBuf = ByteBufAllocator.DEFAULT.compositeBuffer();
        // true 表示增加新的 ByteBuf 自动递增 write index, 否则 write index 会始终为 0
        compositeByteBuf.addComponents(true, buf1, buf2);
        Log.log(compositeByteBuf);
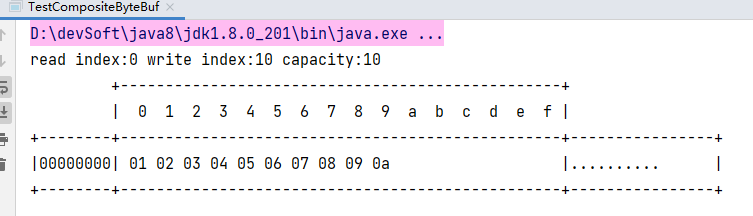
CompositeByteBuf 是一个组合的 ByteBuf,它内部维护了一个 Component 数组,每个 Component 管理一个 ByteBuf,记录了这个 ByteBuf 相对于整体偏移量等信息,代表着整体中某一段的数据。
- 优点,对外是一个虚拟视图,组合这些 ByteBuf 不会产生内存复制
- 缺点,复杂了很多,多次操作会带来性能的损耗
Unpooled
Unpooled 是一个工具类,类如其名,提供了非池化的 ByteBuf 创建、组合、复制等操作
这里仅介绍其跟【零拷贝】相关的 wrappedBuffer 方法,可以用来包装 ByteBuf:
ByteBuf buf1 = ByteBufAllocator.DEFAULT.buffer(5);
buf1.writeBytes(new byte[]{1, 2, 3, 4, 5});
ByteBuf buf2 = ByteBufAllocator.DEFAULT.buffer(5);
buf2.writeBytes(new byte[]{6, 7, 8, 9, 10});
// 当包装 ByteBuf 个数超过一个时, 底层使用了 CompositeByteBuf
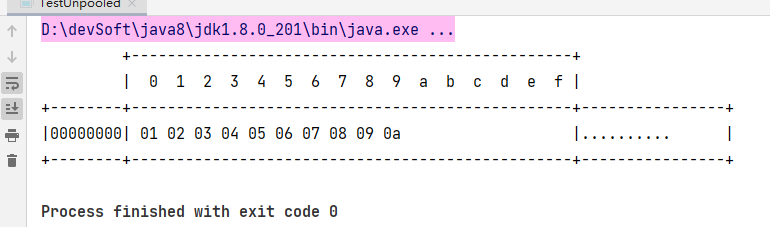
ByteBuf buf3 = Unpooled.wrappedBuffer(buf1, buf2);
System.out.println(ByteBufUtil.prettyHexDump(buf3));
也可以用来包装普通字节数组,底层也不会有拷贝操作:
        ByteBuf buf4 = Unpooled.wrappedBuffer(new byte[]{1, 2, 3}, new byte[]{4, 5, 6});
        System.out.println(buf4.getClass());
        System.out.println(ByteBufUtil.prettyHexDump(buf4));
标签:Netty,00,index,buffer,写入,内存,ByteBuf 来源: https://www.cnblogs.com/wwjj4811/p/16299308.html
本站声明: 1. iCode9 技术分享网(下文简称本站)提供的所有内容,仅供技术学习、探讨和分享; 2. 关于本站的所有留言、评论、转载及引用,纯属内容发起人的个人观点,与本站观点和立场无关; 3. 关于本站的所有言论和文字,纯属内容发起人的个人观点,与本站观点和立场无关; 4. 本站文章均是网友提供,不完全保证技术分享内容的完整性、准确性、时效性、风险性和版权归属;如您发现该文章侵犯了您的权益,可联系我们第一时间进行删除; 5. 本站为非盈利性的个人网站,所有内容不会用来进行牟利,也不会利用任何形式的广告来间接获益,纯粹是为了广大技术爱好者提供技术内容和技术思想的分享性交流网站。