标签:x86 centos etc 64 https linux yum WEEK3 WEEK4
第三周作业
1、统计出/etc/passwd文件中其默认shell为非/sbin/nologin的用户个数,并将用户都显示出来
2、查出用户UID最大值的用户名、UID及shell类型
3、统计当前连接本机的每个远程主机IP的连接数,并按从大到小排序
4、编写脚本disk.sh,显示当前硬盘分区中空间利用率最大的值
5、编写脚本 systeminfo.sh,显示当前主机系统信息,包括:主机名,IPv4地址,操作系统版本,内核版本,CPU型号,内存大小,硬盘大小
6、20分钟内通关vimtutor(可参考https://yyqing.me/post/2017/2017-02-22-vimtutor-chinese-summary)
第四周作业
1、自建yum仓库,分别为网络源和本地源
2、编译安装http2.4,实现可以正常访问,并将编译步骤和结果提交。
3、利用sed 取出ifconfig命令中本机的IPv4地址
4、删除/etc/fstab文件中所有以#开头,后面至少跟一个空白字符的行的行首的#和空白字符
5、处理/etc/fstab路径,使用sed命令取出其目录名和基名
6、列出ubuntu软件管理工具apt的一些用法(自由总结)
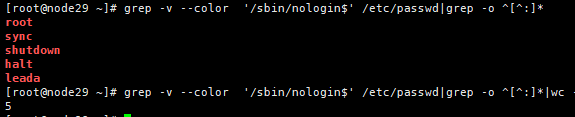
解决3.1
#打印用户名
grep -v --color  '/sbin/nologin$' /etc/passwd|grep -o ^[^:]*
#打印用户个数
grep -v --color  '/sbin/nologin$' /etc/passwd|grep -o ^[^:]*|wc -l
解答3.2
sort -nr -t: -k3 /etc/passwd |head -1
#从结果可以看出来uid 65534 用户名Anonymous Shell:/sbin/nologins

解答3.3
[root@node101 ~]# netstat -antu|grep ESTABLISHED|awk '{print $5}'|egrep --color '^[1-9]{1,3}(.[0-9]{1,3}){3}'|sort|uniq -c|sort -r|head
      9 192.168.3.55:5000
      9 192.168.1.120:8090
      9 192.168.1.120:8080
      9 192.168.1.120:80
      9 192.168.1.102:443
      9 192.168.1.102:3000
      9 192.168.1.100:8081
      9 192.168.1.100:8080
      9 192.168.1.100:6080
      9 192.168.1.100:30090
解答3.4
df -h|grep '[0-9]*\%'|sort -nr -k5|head -1xxxxxxxxxx1 1df -h|grep -o '[0-9]*\%'|sort -nr# df -h|grep '[0-9]*\%'|sort -nr -k5|head -1|head -1

解答3.5
#!/bin/bash
#
HOSTNAME=`hostname`
IPV4ADDR=`hostname -I`
OSVER=`rpm -qi lsb_release >/dev/null && lsb_release -d||echo "lsb_release 没有安装"`
KERNELVER=`uname -r`
CPUFAMILY=`cat /proc/cpuinfo |grep model\ name|head -1|cut -d: -f2`
MEMSIZE=`free -h|awk '/Mem/{print $2}'`
DISKSIZE=`lsblk|awk '/sd[a-z]*\ /{print $1,$4}'|tr '\n' ','|sed 's/ /:/g'`
CPU_INFO=`cat /proc/cpuinfo |grep 'model name'|cut -d: -f2`

echo -en "\n当前主机系统信息包括:\n主机名: $HOSTNAME \nIPv4地址: $IPV4ADDR  \n操作系统版本 :$OSVER  \n内核版本: $KERNELVER \nCPU型号: $CPUFAMILY   \n内存大小: $MEMSIZE  \n硬盘大小: $DISKSIZE "
解答4.1
-
自建网络源:
1在yum服务端自建centos7源仓库,并拉取一次
#创建目录和文件:
mkdir -pv /opt/data/centos/
cd /opt/data/centos/
mkdir -pv /var/www/html/centos/7 tools/{conf,log,repos.d/7}

#安装必要包和服务:
yum install -y httpd yum-utils
#关闭 firewalld或放行80端口,并启动httpd服务
systemctl stop firewalld
systemctl enable --now httpd


#创建yum.conf文件
cat <<EOF>>tools/conf/7.conf
[main]
cachedir=/opt/data/centos/cache/yum/centos/x86_64/7
keepcache=0
debuglevel=2
logfile=/opt/data/centos/log/yum.log
exactarch=1
obsoletes=0
gpgcheck=1
plugins=0
installonly_limit=3
reposdir=/opt/data/centos/tools/repos.d/7
EOF

#创建7.repo
cat <<EOF>> tools/repos.d/7/7.repo
[base]
name=CentOS-base-x86_64
#baseurl=file:///misc/cd
#	https://mirror.tuna.tsinghua.edu.cn/centos/7/os/x86_64/
baseurl=https://mirror.tuna.tsinghua.edu.cn/centos/7/os/x86_64/
	https://mirrors.huaweicloud.com/centos/7/os/x86_64/
	https://mirrors.cloud.tencent.com/centos/7/os/x86_64/
	https://mirrors.aliyun.com/centos/7/os/x86_64/
gpgcheck=0
enable=1

[extras]
name=CentOS-extras-x86_64
baseurl=https://mirror.tuna.tsinghua.edu.cn/centos/7/extras/x86_64/
	https://mirrors.huaweicloud.com/centos/7/extras/x86_64/
	https://mirrors.cloud.tencent.com/centos/7/extras/x86_64/
	https://mirrors.aliyun.com/centos/7/extras/x86_64/
gpgcheck=0
enable=1

[epel]
name=CentOS-epel-x86_64
baseurl=https://mirror.tuna.tsinghua.edu.cn/epel/7/x86_64/
	https://mirrors.huaweicloud.com/epel/7/x86_64/
	https://mirrors.cloud.tencent.com/epel/7/x86_64/
	https://mirrors.aliyun.com/epel/7/x86_64/
gpgcheck=0
enable=1
EOF

#拉取repoID epel base extras
#如果网络不好,可以在前面加 nohup 后面加  &
cd /opt/data/centos/
reposync -m -c tools/conf/7.conf -r epel -p /var/www/html/centos/7 -n >> /tmp/repoSync.log 2>&1
reposync -m -c tools/conf/7.conf -r base -p /var/www/html/centos/7 >> /tmp/repoSync.log  2>&1
reposync -m -c tools/conf/7.conf -r extras -p /var/www/html/centos/7 >> /tmp/repoSync.log  2>&1

#服务端结束
2 客户端配置:
#提供客户端repo yum客户端文件(服务端IP:10.1.8.20)
cat <<EOF>> /etc/yum.repos.d/base.repo
[base]
name=CentOS-base-$release-$basearch
baseurl=http://10.1.8.20/centos/7/os/
gpgcheck=0
enable=1

[extras]
name=CentOS-extras-$release-$basearch
baseurl=http://10.1.8.20/centos/7/extras/
gpgcheck=0
enable=1

[epel]
name=CentOS-epel-$release-$basearch
baseurl=http://10.1.8.20/centos/7/epel/
gpgcheck=0
enable=1
-
本地源创建:
- 挂载光盘或正常的yum源文件(一般有
Packagescomps.xml要素)到本地
#挂载 mount /dev/sr0 /mnt #移除无效repo,然后建新的 mkdir /etc/yum.repos.d/bak mv /etc/yum.repos.d/{*.repo,bak} cat <<EOF>>/etc/yum.repos.d/base.repo [base] name=CentOS7.9 baseurl=file:///mnt/ enable=1 gpgcheck=0 #重新生成缓存 yum clean all yum makecache - 挂载光盘或正常的yum源文件(一般有
解答4.2 (编译httpd2.4)
#下载
yum install -y  gcc make autoconf gcc-c++ glibc glibc-devel pcre pcre-devel openssl openssl-devel systemd-devel zlib-devel  vim lrzsz tree tmux lsof tcpdump wget net-tools iotop bc bzip2 zip unzip nfs-utils man-pages
yum install-y  apr-devel apr-util-devel
./configure --prefix=/opt/httpd --sysconfdir=/opt/httpd/conf --enable-ssl
#报错中缺少大写的包比如 APR …  要安装apr-devel
#这里多核的话 make -j2
make
make install
#path
echo "PATH=/opt/httpd/bin:$PATH" >> /etc/profile.d/httpd.sh
. /etc/profile.d/httpd.sh
#系统用户与组apache
groupadd -r -g 88 apache
useradd -r -u 88 -g apache -s /sbin/nologin -d /opt/var/www apache

#更新apache配置文件
sed -i -e '/^User/c User apache' -e '/^Group/c Group apache' /opt/httpd/conf/httpd.conf
apachectl start
#此时可以访问,如访问失败放行防火墙
解答4.3
ifconfig|sed -n '/inet addr:/p'|sed 's/[a-Z:]*//g'

解答4.4
sed -ri 's/^#(\ ){1,}//' fstab
解答4.5
[root@node29 ~]# cat /etc/fstab |grep -o ^\/[^[:space:]]*|sed 's/\/.*\///'
centos-root
centos-swap
[root@node29 ~]# cat /etc/fstab |grep -o ^\/[^[:space:]]*|sed 's/\/[^\/]*$//'
/dev/mapper
/dev/mapper
解答4.6
apt用法:
apt update 要经常用,安装过软件一般需要
apt remove PKG 删除不彻底,不含/etc/配置
apt purge PKG 更彻底

apt-file  类似于yum provides 查文件的包
	apt-file search OPT file
		-F 普通匹配
		-x 正则匹配


apt-cache stats 查看详细情况
apt-cache show xxx 查看更详细情况
apt-cache madison docker-ce 显示可用版本

#查询软件xxx被哪些包依赖
apt rdepends xxx
apt-cache rdepends xxx
标签:x86,centos,etc,64,https,linux,yum,WEEK3,WEEK4 来源: https://www.cnblogs.com/2022hy/p/16128340.html
本站声明: 1. iCode9 技术分享网(下文简称本站)提供的所有内容,仅供技术学习、探讨和分享; 2. 关于本站的所有留言、评论、转载及引用,纯属内容发起人的个人观点,与本站观点和立场无关; 3. 关于本站的所有言论和文字,纯属内容发起人的个人观点,与本站观点和立场无关; 4. 本站文章均是网友提供,不完全保证技术分享内容的完整性、准确性、时效性、风险性和版权归属;如您发现该文章侵犯了您的权益,可联系我们第一时间进行删除; 5. 本站为非盈利性的个人网站,所有内容不会用来进行牟利,也不会利用任何形式的广告来间接获益,纯粹是为了广大技术爱好者提供技术内容和技术思想的分享性交流网站。