标签:__ return name 登录 flask app 三件套 user
[toc]
# 一:Python flask框架
## 前言
```python
1.Python 面向对象的高级编程语言,以其语法简单、免费开源、免编译扩展性高,同时也可以嵌入到C/C++程序和丰富的第三方库,Python运用到大数据分析、人工智能、web后端等应用场景上。
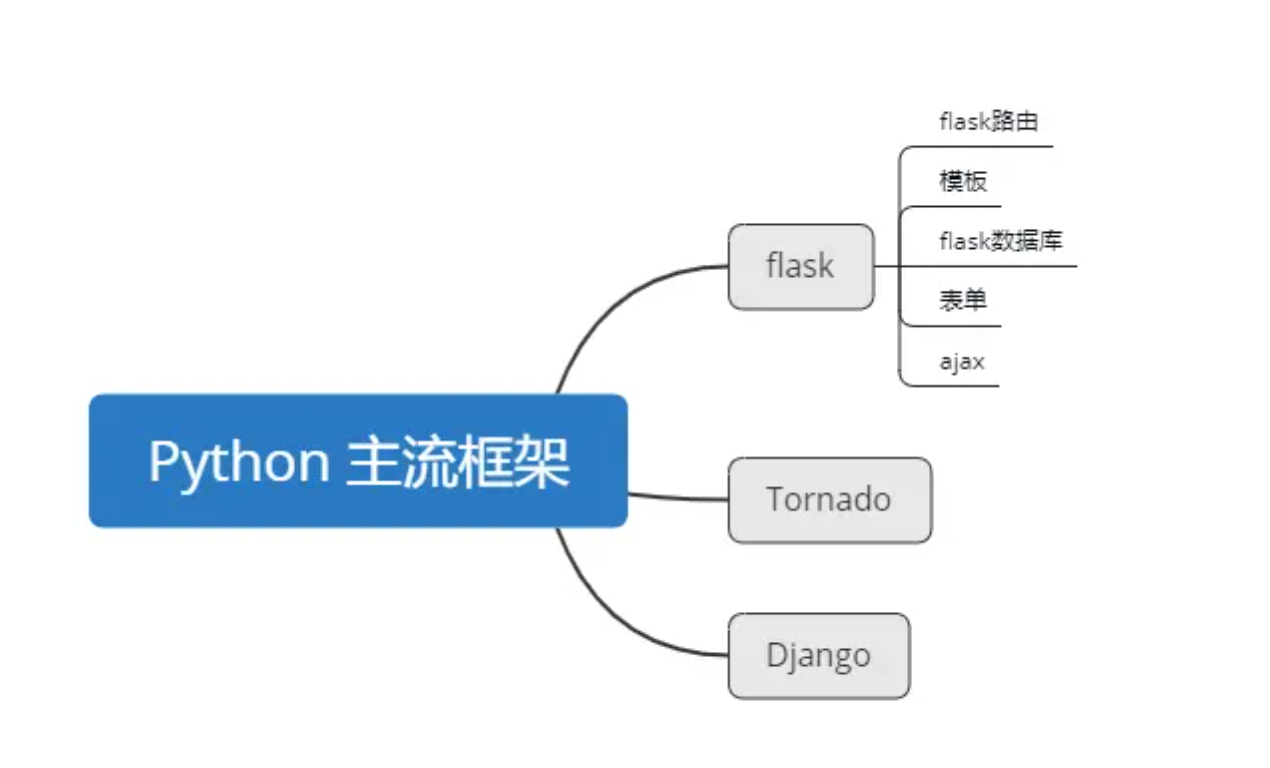
2.Python 目前主要流行的web框架:flask、Django、Tornado
```
### 补充一下,我们前面学习的库都是叫模块,那么框架与库的区别?
```python
1.框架(framework)跟库的功能类似,但是框架在某一领域上功能更加全面。使用框架,会减少开发者重复造轮子,直接调用其类或者函数就可以实现需求的功能。
2.那么,我们本期来学习Python提供的 web 框架之一-flask框架相关方法的学习,Let's go~
```
# 二:flask 框架概述
### 1.简介
```python
1.falsk框架是一款基于WSGI的轻量级的Web框架,flask犹如耳详的"麻雀虽小,五脏俱全",因此flask具有简单可扩展性的特点.
2.Flask是一个基于Python开发并且依赖jinja2模板和Werkzeug WSGI服务的一个微型框架,对于Werkzeug本质是Socket服务端,其用于接收http请求并对请求进行预处理,然后触发Flask框架,开发人员基于Flask框架提供的功能对请求进行相应的处理,并返回给用户,如果要返回给用户复杂的内容时,需要借助jinja2模板来实现对模板的处理,即:将模板和数据进行渲染,将渲染后的字符串返回给用户浏览器。
3.“微”(micro) 并不表示你需要把整个 Web 应用塞进单个 Python 文件(虽然确实可以 ),也不意味着 Flask 在功能上有所欠缺。微框架中的“微”意味着 Flask 旨在保持核心简单而易于扩展。Flask 不会替你做出太多决策——比如使用何种数据库。而那些 Flask 所选择的——比如使用何种模板引擎——则很容易替换。除此之外的一切都由可由你掌握。如此,Flask 可以与您珠联璧合。
```
### 2.须知:
```python
1.默认情况下,Flask 不包含数据库抽象层、表单验证,或是其它任何已有多种库可以胜任的功能。然而,Flask 支持用扩展来给应用添加这些功能,如同是 Flask 本身实现的一样。众多的扩展提供了数据库集成、表单验证、上传处理、各种各样的开放认证技术等功能。Flask 也许是“微小”的,但它已准备好在需求繁杂的生产环境中投入使用
```
### 3.flask框架的优势
* 基于WSGI应用程序,必须使用显式实例化
* 使用Werkzeug路由系统进行自动排序路由
* 使用Jinja2模板引擎,快速方便使用模板
* 使用线程局部变量,实现快速访问weby应用程序
* 支持异步等待和ASCI(async-first)
* 衔接单元测试,开发人员快速进行测试检查
* 自带开发服务器,无需借助其他第三方网络服务
# 三:flask 安装
### 1.安装flask
```
pip3 install falsk
```
### flask快速使用
##### 2.flask执行流程(入门)
```python
1.一旦请求过滤,执行app(),对象()---->触发类的__call__()
2.请求一来,执行aap()---flask类的__call__方法执行
```
```python
from flask import Flask
# 实例化产生一个Flask对象
app=Flask(__name__)
@app.route('/',methods=['GET',]) # 装饰器(路由匹配)
def index(): # 视图函数
return 'hello world lqz'
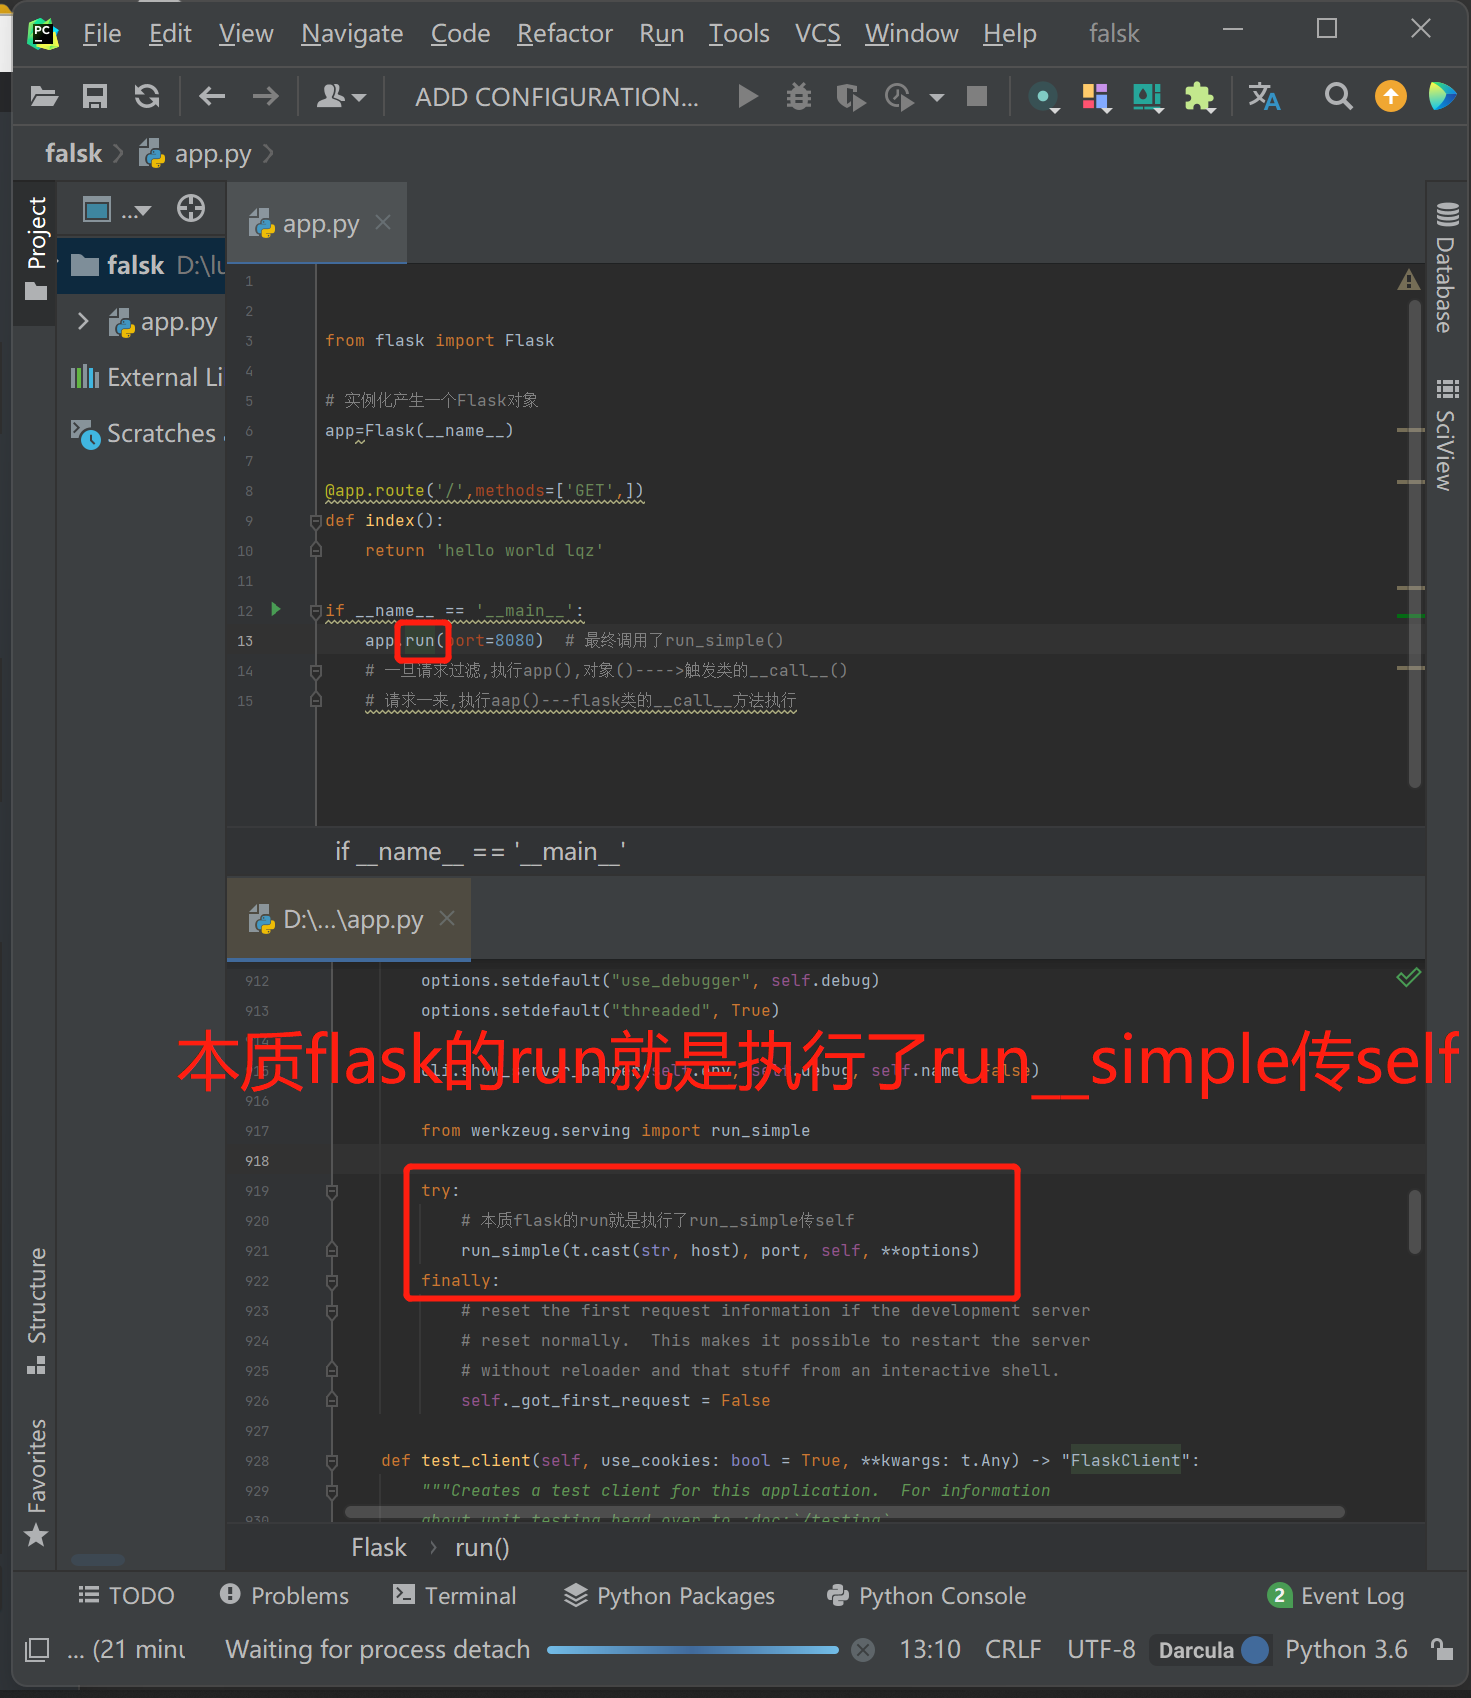
if __name__ == '__main__':
app.run(port=8080) # 最终调用了run_simple(),并传端口,self
```
# 四:登录,显示用户信息案例
### 1.案例:登录,显示用户信息
```python
1.template返回的html文件必须放在template文件夹里面(默认)
# 也可以自定制
app = Flask(__name__, render_template='a')
```
##### main.py
```python
from flask import Flask,render_template,request,redirect,session,url_for
app = Flask(__name__)
app.debug = True
app.secret_key = 'sdfsdfsdfsdf'
USERS = {
1:{'name':'张三','age':18,'gender':'男','text':"道路千万条"},
2:{'name':'李四','age':28,'gender':'男','text':"安全第一条"},
3:{'name':'王五','age':18,'gender':'女','text':"行车不规范"},
}
# 转换器(int:nid)类型(参数get单查)
@app.route('/detail/<int:nid>',methods=['GET'])
def detail(nid):
user = session.get('user_info')
if not user:
return redirect('/login')
# 获取USERS.get(用户传入id)
info = USERS.get(nid)
# 返回html页面,USERS用户信息中的id(用户选择查询)
return render_template('detail.html',info=info)
@app.route('/index',methods=['GET'])
def index():
user = session.get('user_info')
if not user:
# return redirect('/login') # 没有登录重定向到login
url = url_for('l1') # 反向解析,django中severse
return redirect(url) # (没登录,就重定向到login)
return render_template('index.html',user_dict=USERS) # 返回html页面,USERS信息
@app.route('/login',methods=['GET','POST'],endpoint='l1') # 路由中写endpoint='li',那么可以在视图层中使用url_for反向解析出来,路由匹配的地址(login)
def login():
if request.method == "GET":
return render_template('login.html')
else:
# request.query_string
user = request.form.get('user') # django中使用request.POST--->flask: request.form
pwd = request.form.get('pwd')
if user == 'cxw' and pwd == '123':
session['user_info'] = user # 把登录信息放到session中,加密后,以cookie形似,放到浏览器中
return redirect('http://www.baidu.com')
return render_template('login.html',error='用户名或密码错误')
if __name__ == '__main__':
app.run()
```
##### detail.html
```html
<!DOCTYPE html>
<html lang="en">
<head>
<meta charset="UTF-8">
<title>Title</title>
</head>
<body>
<h1>详细信息 {{info.name}}</h1>
<div>
{{info.text}}
</div>
</body>
</html>
```
##### index.html
```html
<!DOCTYPE html>
<html lang="en">
<head>
<meta charset="UTF-8">
<title>Title</title>
</head>
<body>
<h1>用户列表</h1>
<table>
{% for k,v in user_dict.items() %}
<tr>
<td>{{k}}</td>
<td>{{v.name}}</td>
<td>{{v['name']}}</td>
<td>{{v.get('name')}}</td>
<td><a href="/detail/{{k}}">查看详细</a></td>
</tr>
{% endfor %}
</table>
</body>
</html>
```
##### login.html
```html
<!DOCTYPE html>
<html lang="en">
<head>
<meta charset="UTF-8">
<title>Title</title>
</head>
<body>
<h1>用户登录</h1>
<form method="post">
<input type="text" name="user">
<input type="text" name="pwd">
<input type="submit" value="登录">{{error}}
</form>
</body>
</html>
```
# 五:新手三件套
```python
HttpResponse : '' 字符串
render : render_template('模板.html', key=value错误或正确, key=value)
rediret : redirect
```
##### 请求对象
```python
request.GET : request.query_string
request.POST : request.form
```
##### 路由写法
```python
urls.py : 装饰器@app.route('地址', methods=[GET], endpoint='detail')
'地址' : 地址
methods : 请求方式
endpoint : 反向解析(路由解析,视图反向解析)
```
##### 转换器
```python
@app.route('/detail/<int:nid>',methods=['GET']) # 转换器
def detail(nid): # 接收转换器
```
##### 反向解析
```python
django中reverse : flask中url_for-->别名是endpoint指定的,如果不写endpoint会有默认的,默认用函数名
# 装饰器注意
1.如果视图函数加多个装饰器,一定要指定endpoint,不指定就会报错
```
##### 模板语法
```python
跟dtl没有区别,但是它更加强大,可以加括号,可以直接写python语法
```
# 六:登录认证装饰器
```python
1.路由匹配成功才能执行登录认证装饰器,所以登录装饰器加在路由匹配下面
```
### 1.装饰器(没有登录,重定向到login)
```python
def auth(func):
def inner(*args,**kwargs):
user = session.get('user_info')
if not user:
return redirect('/login') # 没有登录,重定向到login
else:
res=func(*args,**kwargs)
return res
return inner
```
### 2.整体代码
```python
from flask import Flask,request,render_template,redirect,session,url_for
# app = Flask(__name__,template_folder='a')
app = Flask(__name__)
app.debug = True # debug模式,开启了,就会热更新
app.secret_key = 'sdfsdfsdfsdf' # 秘钥,django配置文件中的秘钥
def auth(func):
def inner(*args,**kwargs):
user = session.get('user_info')
if not user:
return redirect('/login') # 没有登录,重定向到login
else:
res=func(*args,**kwargs)
return res
return inner
USERS = {
1:{'name':'张三','age':18,'gender':'男','text':"道路千万条"},
2:{'name':'李四','age':28,'gender':'男','text':"安全第一条"},
3:{'name':'王五','age':18,'gender':'女','text':"行车不规范"},
}
@app.route('/login',methods=['GET','POST'])
def login():
if request.method == "GET":
return render_template('login.html') # 返回页面
else:
# request.query_string
user = request.form.get('user') # django中使用request.POST--->flask:request.form
pwd = request.form.get('pwd')
if user == 'lqz' and pwd == '123':
session['user_info'] = user #把登录信息放到session中,加密后,以cookie形式,放到浏览器中了
# return redirect('http://www.baidu.com') # 重定向到百度
return redirect(url_for('index')) # 重定向首页
# return render_template('login.html',error='用户名或密码错误',name='lqz',age=19)
return render_template('login.html',error='用户名或密码错误')
@app.route('/index',methods=['GET'],endpoint='index')
@auth
def index():
# user = session.get('user_info')
# if not user:
# # return redirect('/login') # 没有登录,重定向到login
# # 反向解析
# url = url_for('login') # django中叫 reverse
# return redirect(url)
return render_template('index.html',user_dict=USERS)
@app.route('/detail/<int:pk>',methods=['GET'],endpoint='detail')
@auth
def detail(pk):
user_detail=USERS[pk]
return render_template('detail.html',user_detail=user_detail)
if __name__ == '__main__':
app.run()
```
# 七:配置文件
```python
from flask import Flask,request,render_template,redirect,session,url_for
# 生成Flask对象
app = Flask(__name__)
```
### 1.配置信息
```python
# 方式一:直接通过app对象设置,只能设置这两个,其他不支持
app.secret_key = 'sdfsdfsdfsdf' # 秘钥,django配置文件中的秘钥
pp.debug = False # debug模式,开启了,就会热更新debug模式
# debug模式介绍:
1.flask默认是没有开启debug模式的,开启debug模式有很多好处:第一,可以帮助我们查找代码里面的错误,比如:
# 方式二:直接通过app对象的config(字典)属性设置
app.config['DEBUG']=True # debug模式
print(app.config)
# 方式三:直接使用py文件(指定settings.py文件内写[配置信息])
app.config.from_pyfile("settings.py")
```
### 通过环境变量配置
* 重点方式:后期用这种方式,使用类方式
```python
# 写法格式:
# app.config.from_object("python类或类的路径")
```
```python
# 可以直接指定配置文件类路径
# 优点:
1.开发上线测试直接写多个类配置即可
2.方便切换,上线与未上线时的配置文件配置
3.不需要像django一样要重新创建一个配置文件
# 使用
app.config.from_object('settings.DevelopmentConfig')
print(app.config['DATABASE_URI'])
if __name__ == '__main__':
app.run()
```
* 其他方式:(了解)
```python
# app.config.from_envvar("环境变量名称")
# app.config.from_json("json文件名称")
# app.config.from_mapping({'DEBUG': True})
```
### settings.py配置文件夹
```python
class Config(object):
DEBUG = False
TESTING = False
DATABASE_URI = 'sqlite://:memory:'
class ProductionConfig(Config):
DATABASE_URI = 'mysql://user@localhost/foo'
class DevelopmentConfig(Config):
DEBUG = True
class TestingConfig(Config):
TESTING = True
```
### 内置配置参数(了解)
```python
{
'DEBUG': get_debug_flag(default=False), 是否开启Debug模式
'TESTING': False, 是否开启测试模式
'PROPAGATE_EXCEPTIONS': None,
'PRESERVE_CONTEXT_ON_EXCEPTION': None,
'SECRET_KEY': None,
'PERMANENT_SESSION_LIFETIME': timedelta(days=31),
'USE_X_SENDFILE': False,
'LOGGER_NAME': None,
'LOGGER_HANDLER_POLICY': 'always',
'SERVER_NAME': None,
'APPLICATION_ROOT': None,
'SESSION_COOKIE_NAME': 'session',
'SESSION_COOKIE_DOMAIN': None,
'SESSION_COOKIE_PATH': None,
'SESSION_COOKIE_HTTPONLY': True,
'SESSION_COOKIE_SECURE': False,
'SESSION_REFRESH_EACH_REQUEST': True,
'MAX_CONTENT_LENGTH': None,
'SEND_FILE_MAX_AGE_DEFAULT': timedelta(hours=12),
'TRAP_BAD_REQUEST_ERRORS': False,
'TRAP_HTTP_EXCEPTIONS': False,
'EXPLAIN_TEMPLATE_LOADING': False,
'PREFERRED_URL_SCHEME': 'http',
'JSON_AS_ASCII': True,
'JSON_SORT_KEYS': True,
'JSONIFY_PRETTYPRINT_REGULAR': True,
'JSONIFY_MIMETYPE': 'application/json',
'TEMPLATES_AUTO_RELOAD': None,
}
```
# 八:路由系统
### 典型写法
```python
@app.route('/index/<name>',methods=['GET'],view_func='index',defaults={'name':'lqz'},strict_slashes=True,redirect_to='http://www.baidu.com')
# 参数:
methods : 允许的请求方式
defaults : 视图函数名称
strict_slashes : 严格模式
redirect_to : 访问路由永久重定向
```
### 默认转换器
```python
DEFAULT_CONVERTERS = {
'default': UnicodeConverter,
'string': UnicodeConverter,
'any': AnyConverter,
'path': PathConverter,
'int': IntegerConverter,
'float': FloatConverter,
'uuid': UUIDConverter,
}
```
### 常用路由写法
```python
from flask import Flask,request,render_template,redirect,session,url_for
app = Flask(__name__)
app.debug = True # debug模式,开启了,就会热更新
app.secret_key = 'sdfsdfsdfsdf' # 秘钥,django配置文件中的秘钥
@app.route('/index/<string:name>/<int:pk>',methods=['GET'],endpoint='index')
def index(name,pk):
print(name)
return 'hello'
if __name__ == '__main__':
app.run()
```
### 路由本质(解析)
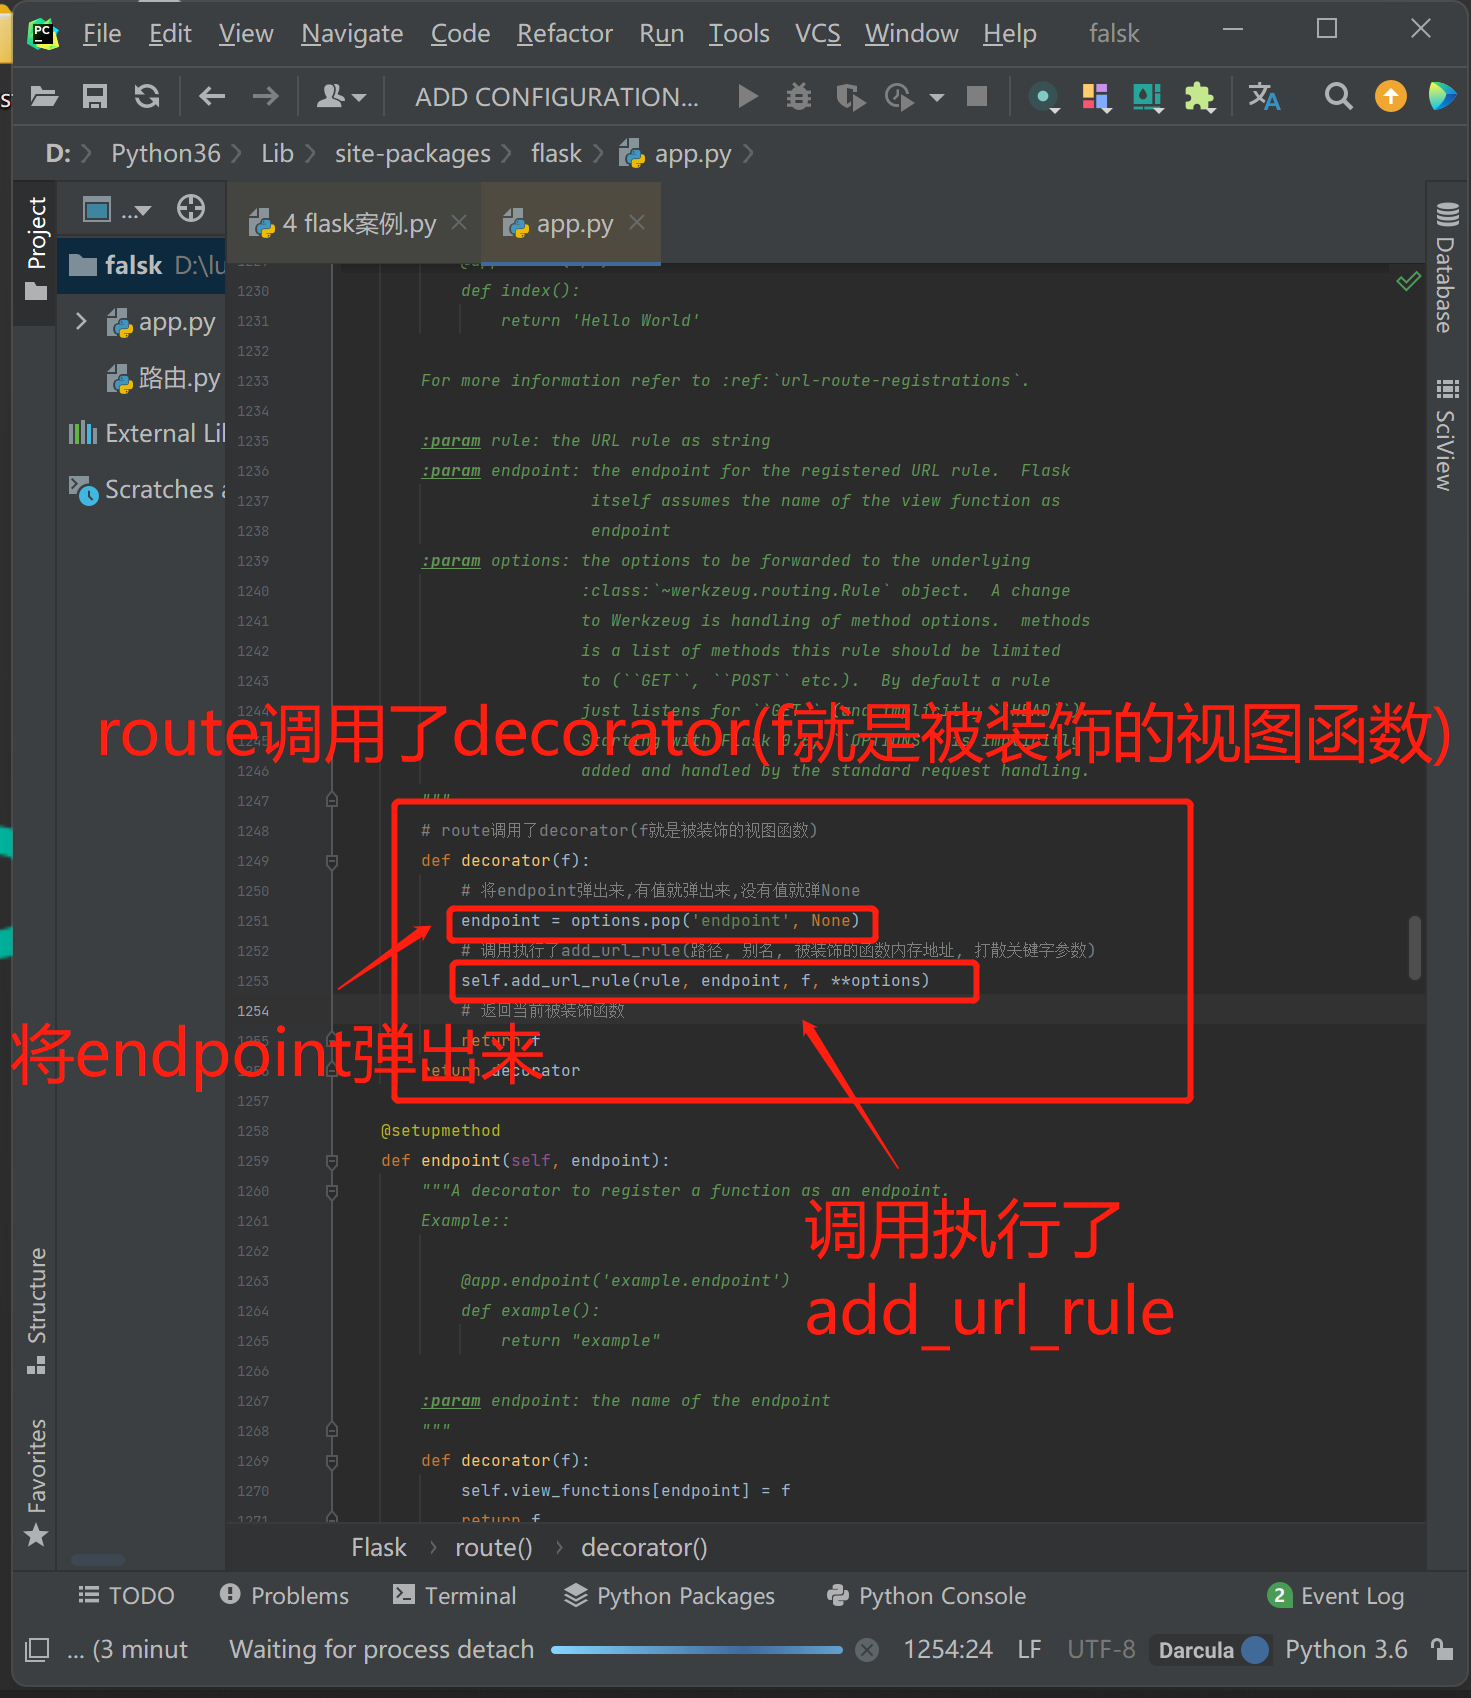
###### 1.当执行route路由时

###### 2.路由本质解析源码
### 路由本质分析
```python
def index(name,pk):
print(name)
return 'hello'
# 路由本质app.add_url_rule
app.add_url_rule('/index',endpoint='index',view_func=index,defaults={'name':'lqz','age':19})
if __name__ == '__main__':
app.run()
```
### 路由本质app.add_url_rule
```python
1.路由系统的本质,就是 app.add_url_rule(路径, 别名, 函数内存地址, **options)
2.endpoint:如果不填,默认就是函数名(加装饰器时要注意)与django路由类似django与flask路由:flask路由基于装饰器,本质是基于:add_url_rule
3.add_url_rule 源码中,endpoint如果为空,endpoint = _endpoint_from_view_func(view_func),最终取view_func.__name__(函数名)
```
### add_url_rule的参数
```python
# rule, URL规则
# view_func, 视图函数名称
# defaults = 默认为None, 默认值, 定义{'k':'v'}数据,那么视图函数也需要定义参数k接收当URL中无参数,函数需要参数时,使用defaults = {'k': 'v'} 为函数提供参数
# endpoint = None, 名称,用于反向生成URL,即: url_for('名称')
# methods = None, 允许的请求方式,如:["GET", "POST"]
```
### strict_slashes = None(严格模式/非严格模式)
```python
# 对URL最后的 / 符号是否严格要求
strict_slashes = None
# 设置True代表严格模式,访问必须带/,设置flase不需要带/自定匹配
@app.route('/index', strict_slashes=False)
```
### redirect_to永远重定向该指定地址
```python
# 重定向到指定地址
redirect_to = None, # 默认None
redirect_to = 'http://www.baidu.com' # 方法该路由永远重定向该指定地址
@app.route('/index/<int:nid>', redirect_to='/home/<nid>')
```
# 九:CBV
```python
1.我们研究flask中CBV源码发现与Django相同.
2.CBV源码:
1.执行as_view--返回dispatch,调用dispatch函数,通过反射,最终执行了/get或post请求.
2.flask中CBV源码与Django中相同
```
```python
from flask import Flask,request,render_template,redirect,session,url_for
from flask.views import View,MethodView
app = Flask(__name__)
app.debug = True # debug模式,开启了,就会热更新
app.secret_key = 'sdfsdfsdfsdf' # 秘钥,django配置文件中的秘钥
class IndexView(MethodView): # cbv必须要继承MethodView
def get(self):
url=url_for('aaa') # 反向解析
print(url)
return '我是get'
def post(self):
return '我是post'
app.add_url_rule('/index',view_func=IndexView.as_view(name='aaa'))
if __name__ == '__main__':
app.run(port=8888)
```
### 总结cbv源码
```python
1.endpoint:如果传了,优先使用endpoint,如果不传使用as_view(name='aaa'),但是name='aaa'必须传
2.cbv要继承MethodView,只需要写get函数,post函数...
3.cbv要继承View,必须重写dispatch,与django中cbv相同
```
## 6 模版
### flask中的模板语法:
```python
# flask中的模板语法:
1.比django中多可以加括号,执行函数,传参数
```
```python
from flask import Flask,request,render_template,redirect,session,url_for,Markup
from flask.views import View,MethodView
app = Flask(__name__)
app.debug = True # debug模式,开启了,就会热更新
app.secret_key = 'sdfsdfsdfsdf' # 秘钥,django配置文件中的秘钥
def test(a,b):
return a+b
class IndexView(MethodView): # 继承MethodView
def get(self):
url=url_for('aaa') # 反向解析
print(url)
# html页面显示标签
# a=Markup('<a href="http://www.baidu.com">点我看美女</a>')
a='<a href="http://www.baidu.com">点我看美女</a>'
return render_template('test.html',name='lqz',test=test,a=a)
def post(self):
return '我是post'
if __name__ == '__main__':
app.run(port=8888)
```
```html
<!DOCTYPE html>
<html lang="en">
<head>
<meta charset="UTF-8">
<title>Title</title>
</head>
<body>
<h1>{{name}}</h1>
<hr>
{{test(4,5)}} // 调用函数并传参
<hr>
{{a}}
{{a|safe}} // 增加safe过滤器,显示a标签
</body>
</html>
```
### html页面(执行函数并传参)

### html页面(显示a标签)

### 总结
```python
1. 跟dtl完全一样,但是它可以执行函数
2. Markup等价django的mark_safe ,
3.extends,include一模一样
```
标签:__,return,name,登录,flask,app,三件套,user 来源: https://www.cnblogs.com/My-zhanglulu/p/16293952.html
本站声明: 1. iCode9 技术分享网(下文简称本站)提供的所有内容,仅供技术学习、探讨和分享; 2. 关于本站的所有留言、评论、转载及引用,纯属内容发起人的个人观点,与本站观点和立场无关; 3. 关于本站的所有言论和文字,纯属内容发起人的个人观点,与本站观点和立场无关; 4. 本站文章均是网友提供,不完全保证技术分享内容的完整性、准确性、时效性、风险性和版权归属;如您发现该文章侵犯了您的权益,可联系我们第一时间进行删除; 5. 本站为非盈利性的个人网站,所有内容不会用来进行牟利,也不会利用任何形式的广告来间接获益,纯粹是为了广大技术爱好者提供技术内容和技术思想的分享性交流网站。